大家好,又见面了,我是你们的朋友全栈君。
红帽系统是可以免费使用的,但是服务是收费的,RHEL7提供了很好的yum源,但是收费,所以如果你的系统是图形化安装,你使用图形化的时候,会有一个窗口弹出,这是红帽的广告插件,但是你不想付费又不想看到这个广告的时候,可以直接关闭的:查看广告插件:
yum list subscript*,删除插件:
yum remove subscript* -y 。


网络源其实也分很多种模式(其实主要区别就是通外网和不通外网),下面我简单概述一下:
注:通外网的情况,是默认配置好yum源的,直接yum install就可以安装大部分包的,如果你要安装的命令yum无法直接安装,才通过下面方法扩展包。 如果通外网的话,配置网络源是超级简单的(前提是ISO自带源没有的情况需要用到),使用方法就是,直接wget 下载到/etc/yum.repos.d中即可直接使用! 自己百度对应系统yum源即可,如(Centos7yum源),我这里提供1个Centos7的阿里云和163的源可以直接使用(不同版本源不能共用哈,比如6不能用7的源):
http://mirrors.aliyun.com/repo/Centos-7.repo
http://mirrors.163.com/.help/CentOS7-Base-163.repo
使用流程:
注:/etc/yum.repos.d中的文件,没用了但文件有用的该备份备份,不需要的该删除删除!
1、wget -O /etc/yum.repos.d/name.repo(自定义以repo结尾的名字) 源路径
2、yum clean all #清除缓存
3、yum makecache #创建缓存,这个其实可以不用执行
4、yum repolist #能出现很多条就算成功(其实就是配置源里的包,一般都有上万个包,而默认就三四千个包。)
如:
# 注,下面返回结果删减过
#最后一条 yum repolist特别重要,能识别到全部源就是配置成功哈
[root@compute1 /etc/yum.repos.d]# wget -O /etc/yum.repos.d/Centos-7.repo http://mirrors.aliyun.com/repo/Centos-7.repo
100%[==================================================================================================================================================>] 2,523       --.-K/s   in 0s

2020-06-24 02:15:55 (200 MB/s) - ‘/etc/yum.repos.d/Centos-7.repo’ saved [2523/2523]

[root@compute1 /etc/yum.repos.d]# ls
Centos-7.repo  yum.repo
[root@compute1 /etc/yum.repos.d]# wget http://mirrors.163.com/.help/CentOS7-Base-163.repo
100%[==================================================================================================================================================>] 1,572       --.-K/s   in 0s

2020-06-24 02:20:40 (109 MB/s) - ‘CentOS7-Base-163.repo’ saved [1572/1572]

[root@compute1 /etc/yum.repos.d]# ls
CentOS7-Base-163.repo  Centos-7.repo  yum.repo
[root@compute1 /etc/yum.repos.d]# yum clean all
[root@compute1 /etc/yum.repos.d]# yum makecache
[root@compute1 /etc/yum.repos.d]# yum repolist
Loaded plugins: fastestmirror, priorities
Repository base is listed more than once in the configuration
Repository updates is listed more than once in the configuration
Repository extras is listed more than once in the configuration
Repository centosplus is listed more than once in the configuration
Loading mirror speeds from cached hostfile
base                                                                                                                                                                 | 3.6 kB  00:00:00
extras                                                                                                                                                               | 2.9 kB  00:00:00
updates                                                                                                                                                              | 2.9 kB  00:00:00
file:///yum/repodata/repomd.xml: [Errno 14] curl#37 - "Couldn't open file /yum/repodata/repomd.xml"
Trying other mirror.
base/7/x86_64/primary_db                                                                                                                                             | 6.1 MB  00:00:01
extras/7/x86_64/primary_db                                                                                                                                           | 194 kB  00:00:00
updates/7/x86_64/primary_db                                                                                                                                          | 2.1 MB  00:00:00
file:///yum/repodata/repomd.xml: [Errno 14] curl#37 - "Couldn't open file /yum/repodata/repomd.xml"
Trying other mirror.
repo id                                                                              repo name                                                                                        status
base/7/x86_64                                                                        CentOS-7 - Base - 163.com                                                                        10,070
extras/7/x86_64                                                                      CentOS-7 - Extras - 163.com                                                                         397
updates/7/x86_64                                                                     CentOS-7 - Updates - 163.com                                                                        760
yum                                                                                  added from: file:///yum                                                                               0
repolist: 11,227
[root@compute1 /etc/yum.repos.d]#
/etc/yum.repos.d目录中即可(如果服务器很多可以用脚本)!!!
至于下面的主服务器配置网络yuan源,更适用于 单个指定yum源!
firewall-cmd --set-default-zone=trusted
getenforce查看状态是否是Permissive 若不是,则vim /etc/selinux/config中SELINUX=这行改为permissive (关闭)

多台服务器间配置yum源需要vsftpd服务,所以如果机器上没有该服务就装上:yum -y install vsftpd ,然后把该服务开启并设置为开机启动:systemctl start vsftpd , systemctl enable vsftpd ,共享目录默认为/var/ftp,所以,无论是服务器挂载光盘目录还是网上下载本地源都需要放到/var/ftp里面(在/var/ftp目录下创建对应的文件夹)。
创建文件挂载光盘:mkdir /var/ftp/dvd,mount挂载光盘到/var/ftp/dvd (注:这种挂载是临时挂载,重启就被取消挂载了 所以每次使用yum 的时候都需要重新挂载一次。永久挂载的话需要把设备 光盘的挂载信息写在 /etc/fstab里面(df -Th查看镜像格式))
挂载成功后里面会出现下列内容

如果是网上下载的源,拷贝到/var/ftp目录中并解压,以ceph为例:tar zxvf ceph.tar.gz
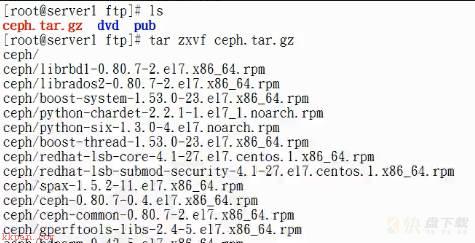
这里以挂载了一个光盘dvd和一个网络源ceph(ceph是解压文件自动生成的目录 ,全名称:/var/ftp/ceph)为例 ( 上图中解压后吧ceph.tar.gz ,pub 删除了):
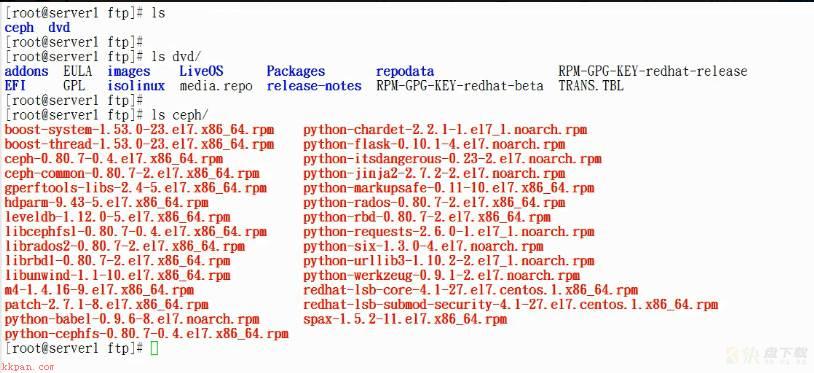
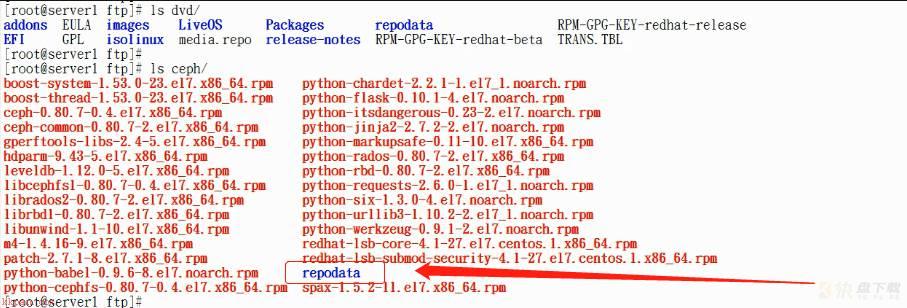
如果是网上下载的源需要做操作(光盘不需要这步操作),以ceph为例:createrepo -v ceph/ ,这时候会读取ceph中的所有源并写入到repodate中,和光盘文件格式略有不同,不必纠结; 这时候主服务器的源便配置完成了,客户端可以正常配置yum源指定到该服务器使用。
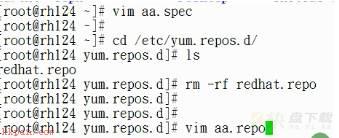
/etc/yum.repos.d/中,如果有其他文件可以删除或创建一个备份文件夹,把现有源移动对备份文件夹中。
开始操作,cd /etc/yum.repos.d/ , 创建一个任意名称以.repo结尾的文件 如vim aa.repo
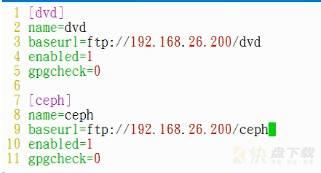
name=wangluoyuan #注释信息
baseurl=ftp://主服务器ip/目录名称  #路径
enabled=0/1 #0是不使用,1是使用 ,一般设置1
gpgcheck=0/1 #是否公钥验证,0是不验证,1是验证,一般设置0
配置完成以后先清除缓存:yum clean all,然后 yum repolist,如果能读取到数量则配置成功。
命令:yum-config-manager --add-repo=后面跟上共享方式和ip和路径
如果记不得或不确定后面的格式,可以–help查看的:
[root@ccx yum.repos.d]# yum-config-manager --help | grep add
    --downloaddir=DLDIR
    --add-repo=ADDREPO  add (and enable) the repo from the specified file or
[root@ccx yum.repos.d]# 说明,命令的方式配置原理和上面的文件配置原理一样,都是写入/etc/yum.repos.d中,只是命令行是自动生成,比较方便。
如果配置同一个源第一次配置路径错了,需要在/etc/yum.repos.d中把之前配置错误的文件删了。
ftp共享方式,下面是我把dev和ceph的源都配置了,分成2次配置的
[root@ccx yum.repos.d]# yum-config-manager --add-repo=ftp://192.168.26.200/dev
Loaded plugins: langpacks, product-id
adding repo from: ftp://192.168.26.200/dev

[192.168.26.200_dev]
name=added from: ftp://192.168.26.200/dev
baseurl=ftp://192.168.26.200/dev
enabled=1


[root@ccx yum.repos.d]# echo gpgcheck=0 >> /etc/yum.repos.d/192.168.26.200_dev.repo
[root@ccx yum.repos.d]# ls
192.168.26.200_dev.repo
[root@ccx yum.repos.d]#
[root@ccx yum.repos.d]# yum-config-manager --add-repo=ftp://192.168.26.200/ceph
Loaded plugins: langpacks, product-id
adding repo from: ftp://192.168.26.200/ceph

[192.168.26.200_ceph]
name=added from: ftp://192.168.26.200/ceph
baseurl=ftp://192.168.26.200/ceph
enabled=1

[root@ccx yum.repos.d]# echo gpgcheck=0 >> /etc/yum.repos.d/192.168.26.200_ceph.repo
[root@ccx yum.repos.d]# ls
192.168.26.200_ceph.repo  192.168.26.200_dev.repo
[root@ccx yum.repos.d]#
配置http共享方式
[root@server0 ~]# yum-config-manager --add-repo=http://classroom.example.com/content/rhel7.0/x86_64/dvd
[root@server0 ~]# echo gpgcheck=0 >> /etc/yum.repos.d/rhel_dvd.repo
注:无论是以什么样的方式挂载,配置完成以后
yum repolist能出现数量即配置成功,也可以选择清除一下缓存:yum clean all
以配置http共享方式的客户端为例,正常如下:Loaded plugins: langpacks repo id repo name status !rhel_dvd Remote classroom copy of dvd 4,305 repolist: 4,305 [root@server0 ~]#
这种方式是直接使用ISO镜像中的源,注意,ISO源要与当前版本一致!
mkdir创建任意文件,用于挂载镜像用;挂载镜像:mount 镜像名 挂载路径即可,如我创建的文件是/test,则mount centos*(镜像文件名) /test,如果要写进fstab中,df -Th查看镜像类型名称。

进入镜像目录:cd 挂载路径,如cd /test , ls 查看

里面有一个Packages的目录,该目录中全是各种源,cd Packages, ls查看
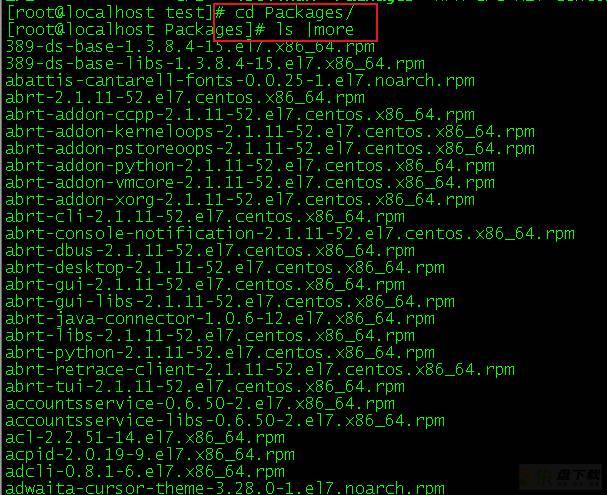
如果想查看,可以在该目录中ls |grep 包名

部分系统挂载ISO镜像以后不需要配置本地源也可以直接yum安装ISO镜像中的包,如果部分系统不支持,就需要配置本地源,然后才能使用yum! (配置本地源见下面)
通过上述方式进入rpm包文件以后,我们可以直接使用rpm包安装该命令的: rpm -ivh 包名 ,如果这个命令有依赖的话,需要用rpm把依赖包也装上,否则也无法使用或者直接安装失败。
现在展示通过rpm安装报依赖错误示范
如,我现在通过rpm安装sysstat命令:
在镜像包中看到,该命令只有一个,直接安装的话就包依赖包错误,这种情况如果不能通外网,就配置本地源吧。
[root@xz-oa-rpa-interface Packages]# ls sysstat*
sysstat-10.1.5-17.el7.x86_64.rpm
[root@xz-oa-rpa-interface Packages]# rpm -ivh sysstat-10.1.5-17.el7.x86_64.rpm
warning: sysstat-10.1.5-17.el7.x86_64.rpm: Header V3 RSA/SHA256 Signature, key ID f4a80eb5: NOKEY
error: Failed dependencies:
	libsensors.so.4()(64bit) is needed by sysstat-10.1.5-17.el7.x86_64
像这个,我就是配置本地源完成安装的,下面放了完整流程命令,也有附加说明【本地源配置方法下面有说明的】
[root@xz-oa-rpa-interface ~]# cd /dev/
[root@xz-oa-rpa-interface dev]# ls centos-7.4 #之前已经上传的镜像
centos-7.4
[root@xz-oa-rpa-interface dev]# mkdir centos #创建挂载镜像目录
[root@xz-oa-rpa-interface dev]# mount centos-7.4 centos #挂载镜像
[root@xz-oa-rpa-interface dev]# df -h |grep centos #查看是否挂载成功
/dev/loop0                  4.3G  4.3G     0 100% /dev/centos
[root@xz-oa-rpa-interface dev]#
[root@xz-oa-rpa-interface Packages]# cd /etc/yum.repos.d/ #进到本地源目录
[root@xz-oa-rpa-interface yum.repos.d]# ls
CentOS-Base.repo  CentOS-CR.repo  CentOS-Debuginfo.repo  CentOS-fasttrack.repo  CentOS-Media.repo  CentOS-Sources.repo  CentOS-Vault.repo
[root@xz-oa-rpa-interface yum.repos.d]# mkdir bak
[root@xz-oa-rpa-interface yum.repos.d]# mv * bak/ #将现有的移动到这里面
mv: cannot move ‘bak’ to a subdirectory of itself, ‘bak/bak’
[root@xz-oa-rpa-interface yum.repos.d]# ls
bak
[root@xz-oa-rpa-interface yum.repos.d]#
[root@xz-oa-rpa-interface yum.repos.d]#
[root@xz-oa-rpa-interface yum.repos.d]# vim centos7-4.repo
[root@xz-oa-rpa-interface yum.repos.d]# cat centos7-4.repo #配置本地源,不会的看下面本地源配置方法,有详细说明
[7.4-bendi]
name=7.4
baseurl=file:///dev/centos
gpgcheck=0
enable=1
[root@xz-oa-rpa-interface yum.repos.d]#
[root@xz-oa-rpa-interface yum.repos.d]# yum repolist #如果最下面数量为0则配置失败
Loaded plugins: fastestmirror
7.4-bendi                                                                                                                                                                                                                                              | 3.6 kB  00:00:00
(1/2): 7.4-bendi/group_gz                                                                                                                                                                                                                              | 166 kB  00:00:00
(2/2): 7.4-bendi/primary_db                                                                                                                                                                                                                            | 3.1 MB  00:00:00
Determining fastest mirrors
repo id                                                                                                                                repo name                                                                                                                        status
7.4-bendi                                                                                                                              7.4                                                                                                                              4,021
repolist: 4,021
[root@xz-oa-rpa-interface ~]# yum whatprovides */sar #这是查看包的方法,无需纠结为什么用sar,我知道sar命令基于sysstat,所以这么用
Loaded plugins: fastestmirror
Loading mirror speeds from cached hostfile
7.4-bendi/filelists_db                                                                                                                                                                                                                                 | 3.2 MB  00:00:00
pcp-4.1.0-4.el7.x86_64 : System-level performance monitoring and performance management
Repo        : 7.4-bendi
Matched from:
Filename    : /var/lib/pcp/config/pmlogconf/tools/sar


sysstat-10.1.5-17.el7.x86_64 : Collection of performance monitoring tools for Linux
Repo        : 7.4-bendi
Matched from:
Filename    : /usr/bin/sar


[root@xz-oa-rpa-interface ~]# yum -y install sysstat-10.1.5-17.el7.x86_64 #通过上面查到的包名复制下来
Loaded plugins: fastestmirror
Loading mirror speeds from cached hostfile
Resolving Dependencies
--> Running transaction check
---> Package sysstat.x86_64 0:10.1.5-17.el7 will be installed
--> Processing Dependency: libsensors.so.4()(64bit) for package: sysstat-10.1.5-17.el7.x86_64
--> Running transaction check
---> Package lm_sensors-libs.x86_64 0:3.4.0-6.20160601gitf9185e5.el7 will be installed
--> Finished Dependency Resolution

Dependencies Resolved

==============================================================================================================================================================================================================================================================================
 Package                                                          Arch                                                    Version                                                                            Repository                                                  Size
==============================================================================================================================================================================================================================================================================
Installing:
 sysstat                                                          x86_64                                                  10.1.5-17.el7                                                                      7.4-bendi                                                  315 k
Installing for dependencies:
 lm_sensors-libs                                                  x86_64                                                  3.4.0-6.20160601gitf9185e5.el7                                                     7.4-bendi                                                   42 k

Transaction Summary
==============================================================================================================================================================================================================================================================================
Install  1 Package (+1 Dependent package)

Total download size: 356 k
Installed size: 1.2 M
Downloading packages:
------------------------------------------------------------------------------------------------------------------------------------------------------------------------------------------------------------------------------------------------------------------------------
Total                                                                                                                                                                                                                                          41 MB/s | 356 kB  00:00:00
Running transaction check
Running transaction test
Transaction test succeeded
Running transaction
  Installing : lm_sensors-libs-3.4.0-6.20160601gitf9185e5.el7.x86_64                                                                                                                                                                                                      1/2
  Installing : sysstat-10.1.5-17.el7.x86_64                                                                                                                                                                                                                               2/2
  Verifying  : lm_sensors-libs-3.4.0-6.20160601gitf9185e5.el7.x86_64                                                                                                                                                                                                      1/2
  Verifying  : sysstat-10.1.5-17.el7.x86_64                                                                                                                                                                                                                               2/2

Installed:
  sysstat.x86_64 0:10.1.5-17.el7

Dependency Installed:
  lm_sensors-libs.x86_64 0:3.4.0-6.20160601gitf9185e5.el7

Complete!
[root@xz-oa-rpa-interface ~]#
[root@xz-oa-rpa-interface yum.repos.d]# sar 1 1 #测试
Linux 3.10.0-693.el7.x86_64 (xz-oa-rpa-interface.novalocal) 	03/18/2021 	_x86_64_	(8 CPU)

09:29:04 AM     CPU     %user     %nice   %system   %iowait    %steal     %idle
09:29:05 AM     all      0.00      0.00      0.00      0.00      0.00    100.00
Average:        all      0.00      0.00      0.00      0.00      0.00    100.00
如 红帽系统yum是无法通过网络(如Centos通外网就不需要配置任何源)来使用的,所以如要使用yum,就必须要有yum源,可以直接把红帽系统镜像上传到服务器,然后mount挂载镜像到/mnt(自定义文件名)也可以直接使用yum哦,镜像自带有yum源的。如果挂载镜像依然不能使用,就去把镜像配置成本地源!
前提条件参考上面的直接ISO使用镜像源(上传镜像,创目录并挂载该镜像,如果不写进fstab中,则每次重启后都需要手动mount后才能使用yum)。
如:我的镜像在/root目录下,挂载到/home/rhel目录下:
[root@station ~]# mkdir /home/rhel
[root@station ~]#
[root@station ~]# mount rhel-server-7.0-x86_64-dvd.iso /home/rhel/
mount: /dev/loop0 is write-protected, mounting read-only
[root@station ~]# df -Th | tail -n 1
/dev/loop0            iso9660   3.5G  3.5G     0 100% /home/rhel
[root@station ~]# pwd
/root
[root@station ~]# ls /root/ | grep rhel-server-7.0-x86_64-dvd.iso
rhel-server-7.0-x86_64-dvd.iso
[root@station ~]#
比较简单,挂载好ISO镜像以后,cd /etc/yum.repos.d/,里面会有许多自带文件,新建一个bak文件夹,把全部文件都移动到bak文件夹中,然后新建一个以.repo结尾的文件,然后写入以下内容:
[root@ccx yum.repos.d]# cd /etc/yum.repos.d
[root@ccx yum.repos.d]# vim ccx.repo
[root@ccx yum.repos.d]# cat ccx.repo
[7.0-bendi]
name=ccx_settin
baseurl=file:///home/rhel
gpgcheck=0
enabled=1
配置文件中参数说明:
[7.0-bendi] #括号中的名称为仓库源名称,通常为字母和数字,必须填写
name=ccx_settin #对yum的描述,可写可不写
#baseurl表示声明yum可以管理并使用的rpm包路径,必须填写 ,格式为:file://,/home/rhel是我挂载镜像的路径
baseurl=file:///home/rhel/
gpgcheck=0 #gpgcheck表示安装rpm包时,是否基于公私钥对匹配包的安全信息,1表示开启,0表示关闭,此项不写默认为验证
enabled=1 #enabled表示当前仓库是否开启,1为开启,0为关闭,此项不写默认为开启
配置完成后,建议清除下之前的缓冲:yum clean all。新建缓存:yum makecache(不建也可) 。
yum list | wc -l 或 yum repolist统计列出所有包的数量,如果列出了,说明yum源配置完成。这里可以看出我的镜像有4305个包。
[root@ccx yum.repos.d]# yum clean all
Loaded plugins: langpacks, product-id, subscription-manager
This system is not registered to Red Hat Subscription Management. You can use subscription-manager to register.
Cleaning repos: 7.0-bendi
Cleaning up everything
[root@ccx yum.repos.d]# yum repolist
Loaded plugins: langpacks, product-id, subscription-manager
This system is not registered to Red Hat Subscription Management. You can use subscription-manager to register.
7.0-bendi                                                | 4.1 kB     00:00
(1/2): 7.0-bendi/group_gz                                  | 134 kB   00:00
(2/2): 7.0-bendi/primary_db                                | 3.4 MB   00:00
repo id                             repo name                             status
7.0-bendi                           ccx_settin                            4,305
repolist: 4,305
[root@ccx yum.repos.d]# yum list | wc -l
4405
[root@ccx yum.repos.d]#
注:如果没有内容或repolist为0,则配置文件中的单词或地址错误或镜像未挂载到文件中的路径。
命令:yum-config-manager --add-repo=file://后面跟上ISO挂载路径即可
如果记不得或不确定后面的格式,可以–help查看的:
[root@ccx yum.repos.d]# yum-config-manager --help | grep add
    --downloaddir=DLDIR
    --add-repo=ADDREPO  add (and enable) the repo from the specified file or
[root@ccx yum.repos.d]# 说明,命令的方式配置原理和上面的文件配置原理一样,都是写入/etc/yum.repos.d中,只是命令行是自动生成,比较方便。如果是配置单一的源,可以先把/etc/yum.repos.d中的文件全部删除,如果用命令的方式配置错了,也需要把该文件中的文件删除,因为路径错了也会生成该配置文件,后面重新配置可能就会导致该源无法使用!
[root@ccx yum.repos.d]# ls
ccx.repo
[root@ccx yum.repos.d]# rm -rf *
[root@ccx yum.repos.d]# ls
[root@ccx yum.repos.d]# yum-config-manager --add-repo=file:///home/rhel
Loaded plugins: langpacks, product-id
adding repo from: file:///home/rhel

[home_rhel]
name=added from: file:///home/rhel
baseurl=file:///home/rhel
enabled=1


[root@ccx yum.repos.d]# echo gpgcheck=0 >> /etc/yum.repos.d/home_rhel.repo
[root@ccx yum.repos.d]# ls
home_rhel.repo
[root@ccx yum.repos.d]# cat home_rhel.repo

[home_rhel]
name=added from: file:///home/rhel
baseurl=file:///home/rhel
enabled=1

gpgcheck=0
[root@ccx yum.repos.d]# yum repolist
Loaded plugins: langpacks, product-id, subscription-manager
This system is not registered to Red Hat Subscription Management. You can use subscription-manager to register.
home_rhel                                                | 4.1 kB     00:00
(1/2): home_rhel/group_gz                                  | 134 kB   00:00
(2/2): home_rhel/primary_db                                | 3.4 MB   00:00
repo id                    repo name                                      status
home_rhel                  added from: file:///home/rhel                  4,305
repolist: 4,305
[root@ccx yum.repos.d]#
http://mirrors.aliyun.com/Centos-7.repo , http://mirrors.aliyun.com/repo/epel-7.repo, http://mirrors.163.com/.help/CentOS7-Base-163.repo
如何用:直接找台能联网的服务器wget 网址 即可下载 ,下载完后 需要拷贝到/etc/yum.repos.d/目录下 或者直接进入到需要服务器的/etc/yum.repos.d/ 目录下下载。

aa(aa是/var/ftp目录中解压的任意需要的源名称,如上述的ceph一样)源以上述方式找到网址wget下载并拷贝到/etc/yum.repo.d/目录中后执行:
createrepo -v /var/ftp/aa/写入到repodate中;
cd /etc/yum.repos.d目录下创建任意名称以.repo结尾的文件;
如:vi aa.repo,写入和本地挂载一样格式 (不懂的参考 镜像源挂载),如我把下载的源mount挂载到/mnt!
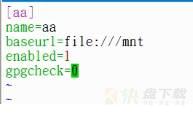
注意:一定要把下载的源mount挂载到文件中指定的路径!
配置完成后,建议清除下之前的缓冲:yum clean all。新建缓存:yum makecache
如果配置了多个本地源:
yum list ceph(源名) --disablerepo=ceph ——禁掉ceph这个源;
yum list ceph --disablerepo=*——禁掉所有源;
yum list ceph --disablerepo=* --enablerepo=ceph——禁掉所有源,但开启ceph这个命令源(也就是只有ceph可以用);
如果我们要把某个源下载到本地不安装,以ceph为例:yum install ceph -y --downloaddir=/xx --downloadonly——下载到/xx这个文件中不安装,本地源不能用。

yum whatprovides */命令,如: yum whatprovides */ ss * 或yum whatprovides **ss*(*根据情况添加)自动搜索最快镜像插件:yum install -y yum-fastestmirror安装yum图形窗口插件:yum install -y umex查看可能批量安装的列表:yum grouplist安装:
yum -y install 全部安装(慎用)
yum -y install package1 安装指定的安装包package1
yum -y groupinsall group1 安装程序组group1更新和升级:
yum update 全部升级源
yum update package1 更新指定程序包package1
yum check-update 检查和更新的程序
yum upgrade package1 升级指定程序包package1
yum groupupdate group1 升级程序组group1查找和显示:
yum infopackage1 显示安装包信息package1
yum list 显示所有已经安装和可以安装的程序包
yum list package1 显示指定程序包安装情况package1
yum search string 根据关键字string 查找安装包
yum deplist package1 查看程序package1依赖关系删除程序:
yum remove package1 删除程序包package1
yum groupmove group1 删除程序组group1清除缓冲:
yum clean packages清除缓冲目录下的软件包
yum clean headers 清除缓冲目录下的headers
yum clean oldheaers清除缓冲目录下旧的headers
yum clean all清除全部缓存查看yum源数量:yum repolist
安装前查看是否有某个命令源:yum search 命令:
如查看vsftpd源:yum search vsftpd;
yum list 命令 查看是否安装该命令。
list和search的区别在于,如yun search vsftp, search查看的是含有vsftpd的源,但list 就查询不了任何结果,所以search相对于模糊查询。 但list 也可以加上*,效果就和search 一样了。所以如果某个命令记不全的时候 可以在前后加上*如yum list vsftp*。
删除已安装的源:yum remove 命令
安装 源:yum install 命令,安装的时候可以加上选项-y,过程中全部选项为yes,直接安装。 -y 可以加在任意位置 如:yum -y install bc , yum install bc -y
搜索命令路径:yum whatprovides */命令 ,一般会有很多,指的是如果安装某个 ,那么这个命令的路径在就在位置。可以在后面或前面加上*。
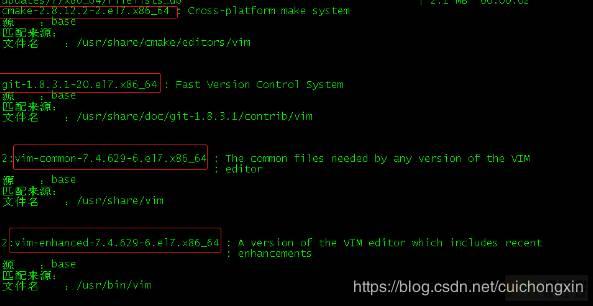
搜出来以后直接:yum -y install 源名
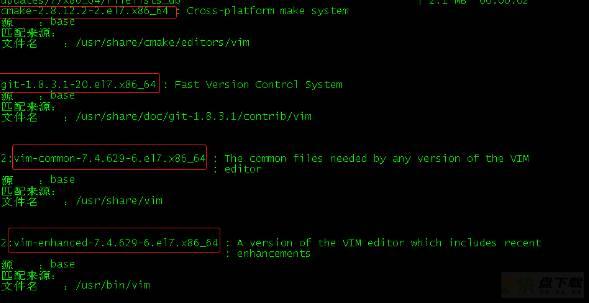
直接去看我这篇博客: um安装包名查找【通过命令查找安装包】&&查看已装安装命令的包
发布者:全栈程序员栈长,转载请注明出处:https://javaforall.cn/170134.html原文链接:https://javaforall.cn