FFmpeg是一款开源软件,用于生成处理多媒体数据的各类库和程序。FFmpeg可以转码、处理视频和图 片(调整视频、图片大小,去噪等)、打包、传输及播放视频。作为最受欢迎的视频和图像处理软件, 早已经被各行各业的不同公司所广泛使用。
当前文章内容分为3个部分。
安装ffmpeg,通过源码进行编译ffmpeg介绍常用的命令行处理,视频转码、摄像头录制、摄像头推流、比如:推流到B站直播间。Ffmpeg代码开发案例:提供Linux多个代码案例可以直接运行,完成的功能与上面的命令一样。开发环境介绍:
linux操作系统: Red Hat 6.3
FFMEG版本:   3.0.2
虚拟机:  vmware® Workstation 15 Pro
USB摄像头:罗技C270i
笔记本自带摄像头:ThinkPad E480
在PC机Linux编译X264需要yasm库。
Yasm是一个完全重写的NASM汇编。它支持x86和AMD64指令集。
Yasm库的官网下载地址: Download - The Yasm Modular Assembler Project
配置编译:
./configure
make
make install
x264是一个免费软件 库和应用程序,用于将视频流编码为 H.264 / MPEG-4 AVC压缩格式,并根据GNU GPL的条款发布。
下载地址: x264, the best H.264/AVC encoder - VideoLAN
功能概述
(1)、提供一流的性能,压缩和功能。
(2)、实现出色的性能,在一台消费者级别的计算机上实时编码4个或更多1080p流。
(3)、提供最好的质量,具有最先进的心理视觉优化。
(4)、许多不同应用程序所必需的支持功能,例如电视广播,蓝光低延迟视频应用程序和Web视频。
(5)、x264构成了许多网络视频服务的核心,例如Youtube,Facebook,Vimeo和Hulu。它已被电视广播公司和ISP广泛使用。
编码器功能
(1)、8x8和4x4自适应空间变换
(2)、自适应B帧放置
(3)、B帧作为参考/任意帧顺序
(4)、CAVLC / CABAC熵编码
(5)、自定义量化矩阵
(6)、内部:所有宏块类型(具有所有预测的16x16、8x8、4x4和PCM)
(7)、Inter P:所有分区(从16x16到4x4)
(8)、Inter B:从16x16到8x8的分区(包括跳过/直接)
(9)、隔行扫描(MBAFF)
(10)、多个参考系
(11)、速率控制:恒定量化器,恒定质量,单通道或多通道ABR,可选VBV
(12)、场景切换检测
(13)、B帧中的时空直接模式,自适应模式选择
(14)、在多个CPU上并行编码
(15)、预测性无损模式
(16)、用于细节保留的Psy优化(自适应量化,psy-RD,psy-网格)
(17)、任意调整比特率分布的区域
X264库编译配置:
[root@wbyq x264-snapshot-20160527-2245]# ./configure --prefix=$PWD/_install --enable-shared --enable-static
[root@wbyq x264-snapshot-20160527-2245]# make install
[root@wbyq x264-snapshot-20160527-2245]# cd _install/
[root@wbyq _install]# tree
.
├── bin
│   └── x264
├── include
│   ├── x264_config.h
│   └── x264.h
└── lib
    ├── libx264.a
    ├── libx264.so -> libx264.so.148
    ├── libx264.so.148
    └── pkgconfig
        └── x264.pc
4 directories, 7 files 为了方便ffmepg命令执行时,可以找到x264的动态库,可以将生成的动态库拷贝到/usr/lib目录下,或者将库路径加入到LD_LIBRARY_PATH 环境变量里。
FFmpeg是领先的多媒体框架,能够解码,编码, 转码,mux,demux,流,过滤和播放几乎所有内容。它支持最模糊的古代格式,直至最前沿。无论它们是由某些标准委员会,社区还是公司设计的。它还具有高度的可移植性:FFmpeg可在各种构建环境,机器体系结构和配置下,跨Linux,Mac OS X,Microsoft Windows,BSD,Solaris等编译,运行并通过我们的测试基础架构 FATE。
它包含可以由应用程序使用的libavcodec,libavutil,libavformat,libavfilter,libavdevice,libswscale和libswresample。与ffmpeg,ffplay和ffprobe一样,最终用户也可以使用它们进行转码和播放。
FFmpeg开发库:
(1)、libavutil是一个包含简化程序功能的库,其中包括随机数生成器,数据结构,数学例程,核心多媒体实用程序等。
(2)、libavcodec是一个库,其中包含音频/视频编解码器的解码器和编码器。
(3)、libavformat是一个包含用于多媒体容器格式的解复用器和复用器的库。
(4)、libavdevice是一个包含输入和输出设备的库,用于从许多常见的多媒体输入/输出软件框架(包Video4Linux,Video4Linux2,VfW和ALSA)中获取和呈现。
(5)、libavfilter是一个包含媒体过滤器的库。
(6)、libswscale是一个执行高度优化的图像缩放和颜色空间/像素格式转换操作的库。
(7)、libswresample是一个执行高度优化的音频重采样,重矩阵化和样本格式转换操作的库。
下载地址: https://ffmpeg.org/download.html
配置FFMPEG:
[root@wbyq ffmpeg-3.0.2]#./configure --enable-shared --enable-static --prefix=$PWD/_install --enable-gpl --extra-cflags=-I/home/wbyq/pc_work/x264-snapshot-20160527-2245/_install/include --extra-ldflags=-L/home/wbyq/pc_work/x264-snapshot-20160527-2245/_install/lib --enable-ffserver --enable-ffmpeg --enable-libx264
编译安装:
[root@wbyq ffmpeg-3.0.2]# make
[root@wbyq ffmpeg-3.0.2]# make install
FFMPEG最新版本4.2.2编译配置:
截止编写文档时,FFMPEG最新版本是4.2.2。

图2-2-1
编译配置方法如下:
[root@wbyq ffmpeg-4.2.2]# ./configure --enable-static --enable-shared --prefix=$PWD/_install --extra-cflags=-I/home/wbyq/pc_work/x264-snapshot-20160527-2245/_install/include --extra-ldflags=-L/home/wbyq/pc_work/x264-snapshot-20160527-2245/_install/lib --enable-ffmpeg --enable-libx264 --enable-gpl
[root@wbyq ffmpeg-4.2.2]#make
[root@wbyq ffmpeg-4.2.2]#make install
编译完成之后,将生成的动态库文件拷贝到/usr/lib目录下,可执行文件拷贝到/usr/bin目录下,方便后期调用。
[root@wbyq /home/wbyq/pc_work/ffmpeg-3.0.2/_install/lib]# cp *.so* /usr/lib
[root@wbyq /home/wbyq/pc_work/ffmpeg-3.0.2/_install/bin]# cp ffmpeg /usr/bin/
查看当前FFMPEG版本信息:
ffmpeg version 3.0.2 Copyright (c) 2000-2016 the FFmpeg developers
built with gcc 4.4.6 (GCC) 20120305 (Red Hat 4.4.6-4)
configuration: --enable-shared --enable-static --prefix=/home/wbyq/pc_work/ffmpeg-3.0.2/_install --enable-gpl --extra-cflags=-I/home/wbyq/pc_work/x264-snapshot-20160527-2245/_install/include --extra-ldflags=-L/home/wbyq/pc_work/x264-snapshot-20160527-2245/_install/lib --enable-ffserver --enable-ffmpeg --enable-libx264
libavutil 55. 17.103 / 55. 17.103
libavcodec 57. 24.102 / 57. 24.102
libavformat 57. 25.100 / 57. 25.100
libavdevice 57. 0.101 / 57. 0.101
libavfilter 6. 31.100 / 6. 31.100
libswscale 4. 0.100 / 4. 0.100
libswresample 2. 0.101 / 2. 0.101
libpostproc 54. 0.100 / 54. 0.100
linux操作系统: Red Hat 6.3
FFMEG版本: 3.0.2
虚拟机: VMware® Workstation 15 Pro
USB摄像头:罗技C270i
笔记本自带摄像头:ThinkPad E480
Ffmpeg源码编译完成之后,会生成一个ffmpeg可执行文件。
ffmpeg是一个非常快速的视频和音频转换器,也可以从实时音频/视频源中获取。它还可以在任意采样率之间转换,并使用高质量的多相滤波器即时调整视频大小。
ffmpeg从该选项指定的任意数量的输入“文件”(可以是常规文件,管道,网络流,抓取设备等)中读取 -i,并写入任意数量的由以下参数指定的输出“文件”一个普通的输出网址。在命令行上找到的所有不能解释为选项的内容都被视为输出URL。
每个输入或输出URL原则上都可以包含任意数量的不同类型的流(视频/音频/字幕/附件/数据)。流的允许数量和/或类型可能会受到容器格式的限制。选择是从哪个输入流进入哪个输出,是自动完成还是通过-map选项进行选择(请参阅“流选择”一章)。
要在选项中引用输入文件,必须使用其索引(从0开始)。例如,第一个输入文件是0,第二个输入文件是,1等等。类似地,文件中的流由其索引引用。例如,2:3引用第三输入文件中的第四流。另请参阅“流说明符”一章。
通常,选项将应用于下一个指定的文件。因此,顺序很重要,您可以在命令行上多次使用相同的选项。然后,将每次出现都应用于下一个输入或输出文件。该规则的例外是全局选项(例如,详细级别),应首先指定。
不要混合输入文件和输出文件–首先指定所有输入文件,然后指定所有输出文件。也不要混用属于不同文件的选项。所有选项仅适用于下一个输入或输出文件,并且在文件之间重置。
先到B站注册账号,开通直播间,在右上角头像--个人中心进入直播间。

图3-1

图3-2

图3-3

图3-4
命令行执行命令:
[root@wbyq ffmpeg-3.0.2]# ./ffmpeg -re -i "/mnt/hgfs/linux-share-dir/123.mp4" -c copy -vcodec libx264 -acodec aac -f flv "<你的rtmp地址><你的直播码>"

参数解析:
-vcodec libx264 指定视频编码格式
-acodec aac 指定音频编码格式
推流给B站的视频,一定要指定视频编码为x264,音频aac否则可能导致传递过去的视频无法播放,或者无法推流。
这里的rtmp地址和直播码,需要替换成自己B站的地址。
-i 参数是指定视频源文件。
推流成功之后,在自己的直播间可以看到推流的视频。
自己的直播间地址,在B站个人中心—我的直播间选项里可以看到。
图3-5
如果指定输入格式和设备,则ffmpeg可以直接捕获视频和音频。
Linux下捕获摄像头的数据保存成视频文件:
# ffmpeg -f video4linux2 -s 1280x720 -i /dev/video0 test.mp4
参数介绍:
-s 指定摄像头输出的图像尺寸
-i 摄像头的设备节点
test.mp4 是保存的视频文件名称
-f video4linux2是指定框架
Linux下捕获声卡的数据保存成音频文件:
(1)# ffmpeg -f alsa -ac 2 -ar 44100 -i default out.wav
参数介绍:
-i 指定声卡设备名称。这里default表示选择默认声卡。
out.wav 捕获的音频数据保存的文件名称
-f 是指定音频驱动类型。alsa是linux下音频驱动框架。 oss是另外一种音频框架。
-ar <freq> 设置音频采样率,以HZ为单位
-ac <channels> 设置音频通道数(单声道、双声道)
(2)# ffmpeg -f alsa -ac 1 -ar 44100 -i default -t 30 out.wav
参数介绍:
-t 30 表示录制30秒就自动停止

(3)# ffmpeg -f alsa -ac 1 -ar 16000 -i hw:0 -t 10 out.wav
参数介绍:
	这里的hw:0 也表示选择默认的声卡设备录音。
列出当前主机上的声卡设备:
[root@wbyq linux-share-dir]# arecord -l   (列出声卡设备数量)
**** List of CAPTURE Hardware Devices ****
card 0: AudioPCI [Ensoniq AudioPCI], device 0: ES1371/1 [ES1371 DAC2/ADC]
  Subdevices: 1/1
  Subdevice #0: subdevice #0
card 1: U0x46d0x825 [USB Device 0x46d:0x825], device 0: USB Audio [USB Audio]
  Subdevices: 0/1
  Subdevice #0: subdevice #0

[root@wbyq linux-share-dir]# arecord -L   (列出声卡设备详细信息)
default
    Default
front:CARD=AudioPCI,DEV=0
    Ensoniq AudioPCI, ES1371 DAC2/ADC
    Front speakers
surround40:CARD=AudioPCI,DEV=0
    Ensoniq AudioPCI, ES1371 DAC2/ADC
    4.0 Surround output to Front and Rear speakers
iec958:CARD=AudioPCI,DEV=0
    Ensoniq AudioPCI, ES1371 DAC2/ADC
    IEC958 (S/PDIF) Digital Audio Output
front:CARD=U0x46d0x825,DEV=0
    USB Device 0x46d:0x825, USB Audio
    Front speakers
surround40:CARD=U0x46d0x825,DEV=0
    USB Device 0x46d:0x825, USB Audio
    4.0 Surround output to Front and Rear speakers
surround41:CARD=U0x46d0x825,DEV=0
    USB Device 0x46d:0x825, USB Audio
    4.1 Surround output to Front, Rear and Subwoofer speakers
surround50:CARD=U0x46d0x825,DEV=0
    USB Device 0x46d:0x825, USB Audio
    5.0 Surround output to Front, Center and Rear speakers
surround51:CARD=U0x46d0x825,DEV=0
    USB Device 0x46d:0x825, USB Audio
    5.1 Surround output to Front, Center, Rear and Subwoofer speakers
surround71:CARD=U0x46d0x825,DEV=0
    USB Device 0x46d:0x825, USB Audio
    7.1 Surround output to Front, Center, Side, Rear and Woofer speakers
iec958:CARD=U0x46d0x825,DEV=0
    USB Device 0x46d:0x825, USB Audio
    IEC958 (S/PDIF) Digital Audio Output
使用arecord -L命令列出了声卡名字之后,就可以选择指定声卡录制声音,其中front:xxx 就是声卡的名字。
选择指定的声卡录制声音示例:
(1). 选择USB摄像头的音频设备录音
# ffmpeg -f alsa -ac 1 -ar 44100 -i front:CARD=U0x46d0x825,DEV=0 -t 10 out.wav

(2). 选择电脑自带的声卡录音
# ffmpeg -f alsa -ac 1 -ar 44100 -i front:CARD=AudioPCI,DEV=0 -t 10 out.wav
FFMPEG录制音频的其他参数:
# ffmpeg --help
音频选项:
-aframes number 设置要输出的音频帧数
-aq quality 设置音频质量(特定于编解码器)
-ar rate 设置音频采样率(以Hz为单位)
-ac channel 设置音频通道数
-an 禁用音频
-acodec codec 强制音频编解码器复制到流
-vol volume   更改音频音量(256=正常)
-af filter_graph 设置音频过滤器
命令示例:
#ffmpeg -f alsa -ac 1 -ar 44100 -i front:CARD=U0x46d0x825,DEV=0 -f video4linux2 -i /dev/video0 out.mpg

#ffmpeg -f alsa -ac 1 -ar 16000 -i front:CARD=U0x46d0x825,DEV=0 -f video4linux2 -i /dev/video0 out.mp4
录制MP4格式的视频时,音频采样率设置16000效果比较好一些。
采用MP4格式录制视频的详细信息(视频H264、音频AAC):
Output #0, mp4, to 'out.mp4':
  Metadata:
    encoder         : Lavf57.25.100
    Stream #0:0: Video: h264 (libx264) ([33][0][0][0] / 0x0021), yuv422p, 640x480, q=-1--1, 30 fps, 15360 tbn, 30 tbc
    Metadata:
      encoder         : Lavc57.24.102 libx264
    Side data:
      unknown side data type 10 (24 bytes)
    Stream #0:1: Audio: aac (LC) ([64][0][0][0] / 0x0040), 16000 Hz, mono, fltp, 69 kb/s
    Metadata:
      encoder         : Lavc57.24.102 aac
Stream mapping:
  Stream #1:0 -> #0:0 (rawvideo (native) -> h264 (libx264))
  Stream #0:0 -> #0:1 (pcm_s16le (native) -> aac (native))
采用MPG格式录制视频的详细信息(视频mpeg1video、音频mp2):
Output #0, mpeg, to 'out.mpg':
  Metadata:
    encoder         : Lavf57.25.100
    Stream #0:0: Video: mpeg1video, yuv420p, 640x480, q=2-31, 200 kb/s, 30 fps, 90k tbn, 30 tbc
    Metadata:
      encoder         : Lavc57.24.102 mpeg1video
    Side data:
      unknown side data type 10 (24 bytes)
    Stream #0:1: Audio: mp2, 48000 Hz, mono, s16, 384 kb/s
    Metadata:
      encoder         : Lavc57.24.102 mp2
Stream mapping:
  Stream #1:0 -> #0:0 (rawvideo (native) -> mpeg1video (native))
Stream #0:0 -> #0:1 (pcm_s16le (native) -> mp2 (native)) 视频转为图片:
# ffmpeg -i 123.mp4 image_%d.jpg
将123.mp4的视频每一帧画面保存为一张张图片。
图片转为视频:
# ffmpeg -f image2 -i image_%d.jpg video.mpg
[root@wbyq ffmpeg_video]# ffmpeg -encoders
ffmpeg version 4.2.2 Copyright (c) 2000-2019 the FFmpeg developers
  built with gcc 4.4.6 (GCC) 20120305 (Red Hat 4.4.6-4)
  configuration: --enable-static --enable-shared --prefix=/home/wbyq/pc_work/ffmpeg-4.2.2/_install --extra-cflags=-I/home/wbyq/pc_work/x264-snapshot-20160527-2245/_install/include --extra-ldflags=-L/home/wbyq/pc_work/x264-snapshot-20160527-2245/_install/lib --enable-ffmpeg --enable-libx264 --enable-gpl
  libavutil      56. 31.100 / 56. 31.100
  libavcodec     58. 54.100 / 58. 54.100
  libavformat    58. 29.100 / 58. 29.100
  libavdevice    58.  8.100 / 58.  8.100
  libavfilter     7. 57.100 /  7. 57.100
  libswscale      5.  5.100 /  5.  5.100
  libswresample   3.  5.100 /  3.  5.100
  libpostproc    55.  5.100 / 55.  5.100
Encoders:
 V..... = Video
 A..... = Audio
 S..... = Subtitle
 .F.... = Frame-level multithreading
 ..S... = Slice-level multithreading
 ...X.. = Codec is experimental
 ....B. = Supports draw_horiz_band
 .....D = Supports direct rendering method 1
 ------
 V..... a64multi             Multicolor charset for Commodore 64 (codec a64_multi)
 V..... a64multi5            Multicolor charset for Commodore 64, extended with 5th color (colram) (codec a64_multi5)
 V..... alias_pix            Alias/Wavefront PIX image
 V..... amv                  AMV Video
 V..... apng                 APNG (Animated Portable Network Graphics) image
 V..... asv1                 ASUS V1
 V..... asv2                 ASUS V2
 V..... avrp                 Avid 1:1 10-bit RGB Packer
 V..X.. avui                 Avid Meridien Uncompressed
 V..... ayuv                 Uncompressed packed MS 4:4:4:4
 V..... bmp                  BMP (Windows and OS/2 bitmap)
 V..... cinepak              Cinepak
 V..... cljr                 Cirrus Logic AccuPak
 V.S... vc2                  SMPTE VC-2 (codec dirac)
 VFS... dnxhd                VC3/DNxHD
 V..... dpx                  DPX (Digital Picture Exchange) image
 VFS... dvvideo              DV (Digital Video)
 V.S... ffv1                 FFmpeg video codec #1
 VF.... ffvhuff              Huffyuv FFmpeg variant
 V..... fits                 Flexible Image Transport System
 V..... flashsv              Flash Screen Video
 V..... flashsv2             Flash Screen Video Version 2
 V..... flv                  FLV / Sorenson Spark / Sorenson H.263 (Flash Video) (codec flv1)
 V..... gif                  GIF (Graphics Interchange Format)
 V..... h261                 H.261
 V..... h263                 H.263 / H.263-1996
 V.S... h263p                H.263+ / H.263-1998 / H.263 version 2
 V..... libx264              libx264 H.264 / AVC / MPEG-4 AVC / MPEG-4 part 10 (codec h264)
 V..... libx264rgb           libx264 H.264 / AVC / MPEG-4 AVC / MPEG-4 part 10 RGB (codec h264)
 VF.... huffyuv              Huffyuv / HuffYUV
 V..... jpeg2000             JPEG 2000
 VF.... jpegls               JPEG-LS
 VF.... ljpeg                Lossless JPEG
 VF.... magicyuv             MagicYUV video
 VFS... mjpeg                MJPEG (Motion JPEG)
 V.S... mpeg1video           MPEG-1 video
 V.S... mpeg2video           MPEG-2 video
 V.S... mpeg4                MPEG-4 part 2
 V..... msmpeg4v2            MPEG-4 part 2 Microsoft variant version 2
 V..... msmpeg4              MPEG-4 part 2 Microsoft variant version 3 (codec msmpeg4v3)
 V..... msvideo1             Microsoft Video-1
 V..... pam                  PAM (Portable AnyMap) image
 V..... pbm                  PBM (Portable BitMap) image
 V..... pcx                  PC Paintbrush PCX image
 V..... pgm                  PGM (Portable GrayMap) image
 V..... pgmyuv               PGMYUV (Portable GrayMap YUV) image
 VF.... png                  PNG (Portable Network Graphics) image
 V..... ppm                  PPM (Portable PixelMap) image
 VF.... prores               Apple ProRes
 VF.... prores_aw            Apple ProRes (codec prores)
 VFS... prores_ks            Apple ProRes (iCodec Pro) (codec prores)
 V..... qtrle                QuickTime Animation (RLE) video
 V..... r10k                 AJA Kona 10-bit RGB Codec
 V..... r210                 Uncompressed RGB 10-bit
 V..... rawvideo             raw video
 V..... roqvideo             id RoQ video (codec roq)
 V..... rv10                 RealVideo 1.0
 V..... rv20                 RealVideo 2.0
 V..... sgi                  SGI image
 V..... snow                 Snow
 V..... sunrast              Sun Rasterfile image
 V..... svq1                 Sorenson Vector Quantizer 1 / Sorenson Video 1 / SVQ1
 V..... targa                TrueVision Targa image
 VF.... tiff                 TIFF image
 VF.... utvideo              Ut Video
 V..... v210                 Uncompressed 4:2:2 10-bit
 V..... v308                 Uncompressed packed 4:4:4
 V..... v408                 Uncompressed packed QT 4:4:4:4
 V..... v410                 Uncompressed 4:4:4 10-bit
 V..... wmv1                 Windows Media Video 7
 V..... wmv2                 Windows Media Video 8
 V..... wrapped_avframe      AVFrame to AVPacket passthrough
 V..... xbm                  XBM (X BitMap) image
 V..... xface                X-face image
 V..... xwd                  XWD (X Window Dump) image
 V..... y41p                 Uncompressed YUV 4:1:1 12-bit
 V..... yuv4                 Uncompressed packed 4:2:0
 VF.... zlib                 LCL (LossLess Codec Library) ZLIB
 V..... zmbv                 Zip Motion Blocks Video
 A..... aac                  AAC (Advanced Audio Coding)
 A..... ac3                  ATSC A/52A (AC-3)
 A..... ac3_fixed            ATSC A/52A (AC-3) (codec ac3)
 A..... adpcm_adx            SEGA CRI ADX ADPCM
 A..... g722                 G.722 ADPCM (codec adpcm_g722)
 A..... g726                 G.726 ADPCM (codec adpcm_g726)
 A..... g726le               G.726 little endian ADPCM ("right-justified") (codec adpcm_g726le)
 A..... adpcm_ima_qt         ADPCM IMA QuickTime
 A..... adpcm_ima_wav        ADPCM IMA WAV
 A..... adpcm_ms             ADPCM Microsoft
 A..... adpcm_swf            ADPCM Shockwave Flash
 A..... adpcm_yamaha         ADPCM Yamaha
 A..... alac                 ALAC (Apple Lossless Audio Codec)
 A..... aptx                 aptX (Audio Processing Technology for Bluetooth)
 A..... aptx_hd              aptX HD (Audio Processing Technology for Bluetooth)
 A..... comfortnoise         RFC 3389 comfort noise generator
 A..X.. dca                  DCA (DTS Coherent Acoustics) (codec dts)
 A..... eac3                 ATSC A/52 E-AC-3
 A..... flac                 FLAC (Free Lossless Audio Codec)
 A..... g723_1               G.723.1
 A..X.. mlp                  MLP (Meridian Lossless Packing)
 A..... mp2                  MP2 (MPEG audio layer 2)
 A..... mp2fixed             MP2 fixed point (MPEG audio layer 2) (codec mp2)
 A..... nellymoser           Nellymoser Asao
 A..X.. opus                 Opus
 A..... pcm_alaw             PCM A-law / G.711 A-law
 A..... pcm_dvd              PCM signed 16|20|24-bit big-endian for DVD media
 A..... pcm_f32be            PCM 32-bit floating point big-endian
 A..... pcm_f32le            PCM 32-bit floating point little-endian
 A..... pcm_f64be            PCM 64-bit floating point big-endian
 A..... pcm_f64le            PCM 64-bit floating point little-endian
 A..... pcm_mulaw            PCM mu-law / G.711 mu-law
 A..... pcm_s16be            PCM signed 16-bit big-endian
 A..... pcm_s16be_planar     PCM signed 16-bit big-endian planar
 A..... pcm_s16le            PCM signed 16-bit little-endian
 A..... pcm_s16le_planar     PCM signed 16-bit little-endian planar
 A..... pcm_s24be            PCM signed 24-bit big-endian
 A..... pcm_s24daud          PCM D-Cinema audio signed 24-bit
 A..... pcm_s24le            PCM signed 24-bit little-endian
 A..... pcm_s24le_planar     PCM signed 24-bit little-endian planar
 A..... pcm_s32be            PCM signed 32-bit big-endian
 A..... pcm_s32le            PCM signed 32-bit little-endian
 A..... pcm_s32le_planar     PCM signed 32-bit little-endian planar
 A..... pcm_s64be            PCM signed 64-bit big-endian
 A..... pcm_s64le            PCM signed 64-bit little-endian
 A..... pcm_s8               PCM signed 8-bit
 A..... pcm_s8_planar        PCM signed 8-bit planar
 A..... pcm_u16be            PCM unsigned 16-bit big-endian
 A..... pcm_u16le            PCM unsigned 16-bit little-endian
 A..... pcm_u24be            PCM unsigned 24-bit big-endian
 A..... pcm_u24le            PCM unsigned 24-bit little-endian
 A..... pcm_u32be            PCM unsigned 32-bit big-endian
 A..... pcm_u32le            PCM unsigned 32-bit little-endian
 A..... pcm_u8               PCM unsigned 8-bit
 A..... pcm_vidc             PCM Archimedes VIDC
 A..... real_144             RealAudio 1.0 (14.4K) (codec ra_144)
 A..... roq_dpcm             id RoQ DPCM
 A..X.. s302m                SMPTE 302M
 A..... sbc                  SBC (low-complexity subband codec)
 A..X.. sonic                Sonic
 A..X.. sonicls              Sonic lossless
 A..X.. truehd               TrueHD
 A..... tta                  TTA (True Audio)
 A..X.. vorbis               Vorbis
 A..... wavpack              WavPack
 A..... wmav1                Windows Media Audio 1
 A..... wmav2                Windows Media Audio 2
 S..... ssa                  ASS (Advanced SubStation Alpha) subtitle (codec ass)
 S..... ass                  ASS (Advanced SubStation Alpha) subtitle
 S..... dvbsub               DVB subtitles (codec dvb_subtitle)
 S..... dvdsub               DVD subtitles (codec dvd_subtitle)
 S..... mov_text             3GPP Timed Text subtitle
 S..... srt                  SubRip subtitle (codec subrip)
 S..... subrip               SubRip subtitle
 S..... text                 Raw text subtitle
 S..... webvtt               WebVTT subtitle
 S..... xsub                 DivX subtitles (XSUB)
(1). 在红帽6.3系统上运行: 推流本地实时音频视频到流媒体服务器
示例:
[wbyq@wbyq linux_c]$ ffmpeg -f video4linux2  -r 12 -s 640x480 -i /dev/video0 -f alsa -i default -ar 44100 -ac 1 -f mp3 -qscale 10 -f flv "rtmp://47.92.114.13:8086/live/123"

参数解析:
-f video4linux2 指定linux下的视频驱动框架
-s 640x480  指定视频尺寸
-i /dev/video0 摄像头节点
f alsa 声卡驱动框架
-i default  选择声卡,这里选择默认声卡
-ar 44100  声音采样频率
-ac 1   单声道
-f mp3  MP3音频
-qscale 10 设置画面质量,值越小画面质量越高
f flv   指定封装格式
"rtmp://47.92.114.13:8086/live/123"  流媒体服务器地址
(2). 推流同时保存视频到本地
示例:
[wbyq@wbyq linux-share-dir]$ ffmpeg -thread_queue_size 128 -f video4linux2  -r 12 -s 1280x720 -i /dev/video0 -f alsa -i default -ar 44100 -ac 1 -f mp3 -qscale 5 -f flv "rtmp://47.92.114.13:8086/live/123" output.h264

参数解析:
当这个任务消耗有点大时,-thread_queue_size 必须设置一个比较大的值,不然会看到 FFmpeg输出的日志信息中不停的提醒:[video4linux2,v4l2 @ 0x25fbc40] Thread message queue blocking; consider raising the thread_queue_size option (current value: 8),拍摄到的视频也会出现莫名其妙的错误,比如帧率很高,无法正常播放,视频不流畅等等。把 -thread_queue_size 设置为一个比较大的值,直到看不到该提示即可。
下面截图是使用ffmpeg将本地摄像头和声卡的数据推流到自己搭建的流媒体服务器之后,再使用VLC软件拉流进行显示,也可以使用Mplayer播放器进行拉流显示。
Linux下搭建流媒体服务器:ginx+rtmp+ffmpeg 可以实现。
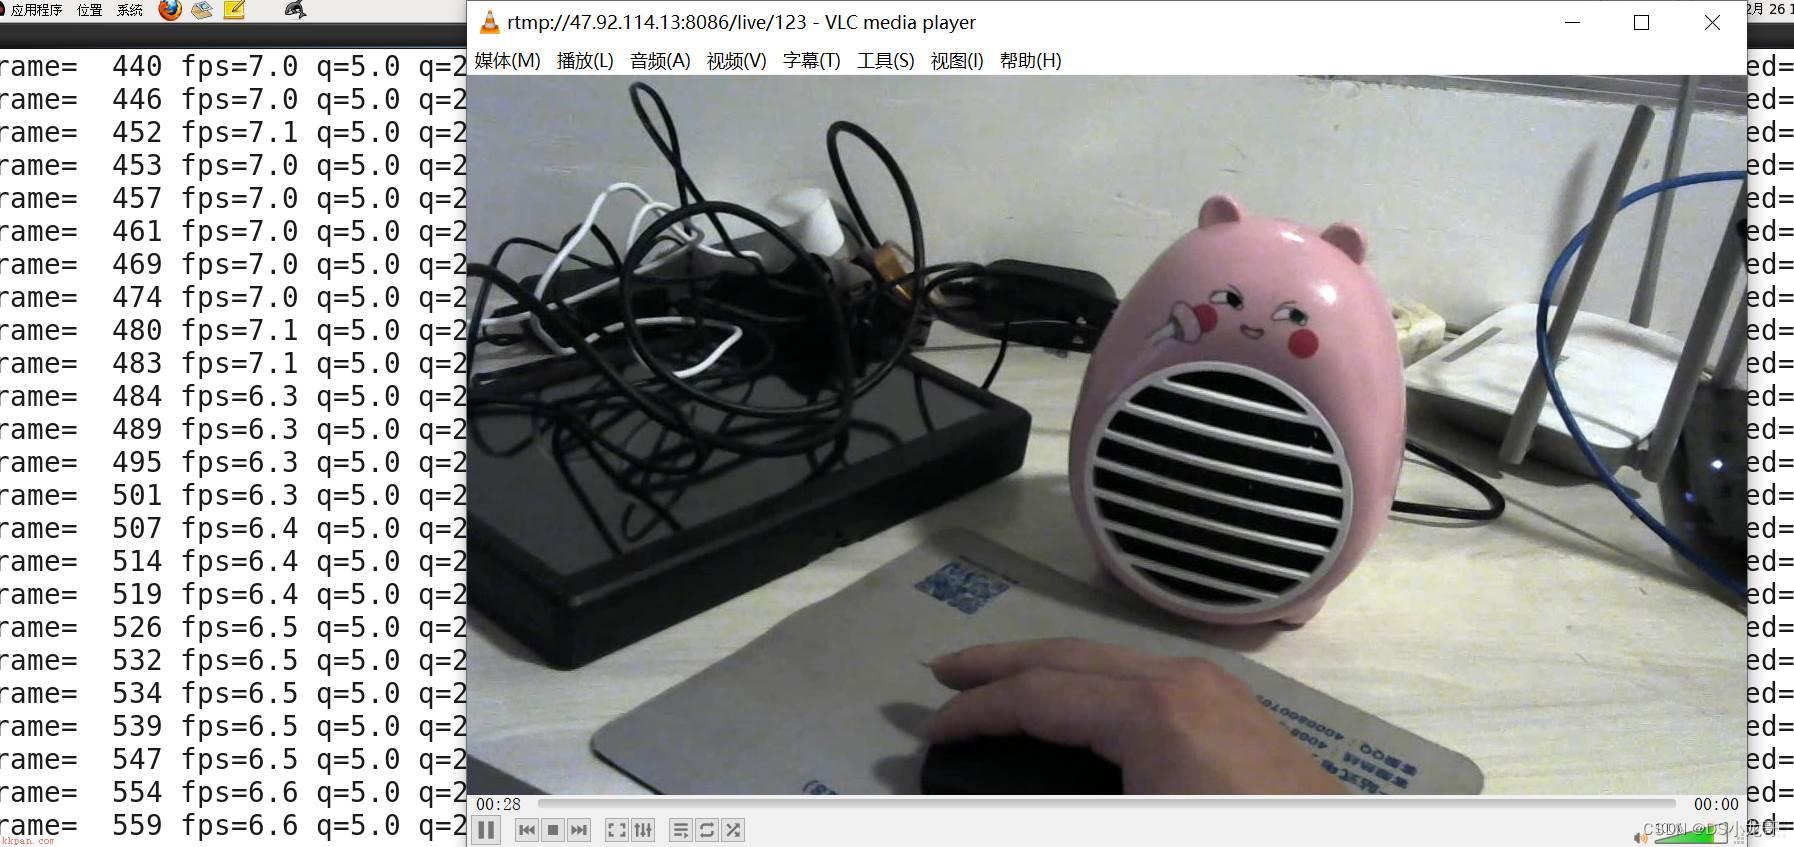
图3-7-1 windows下使用VLC软件拉流显示效果
Mplayer命令拉流显示流媒体视频示例:
mplayer -framedrop rtmp://47.92.114.13:8086/live/123
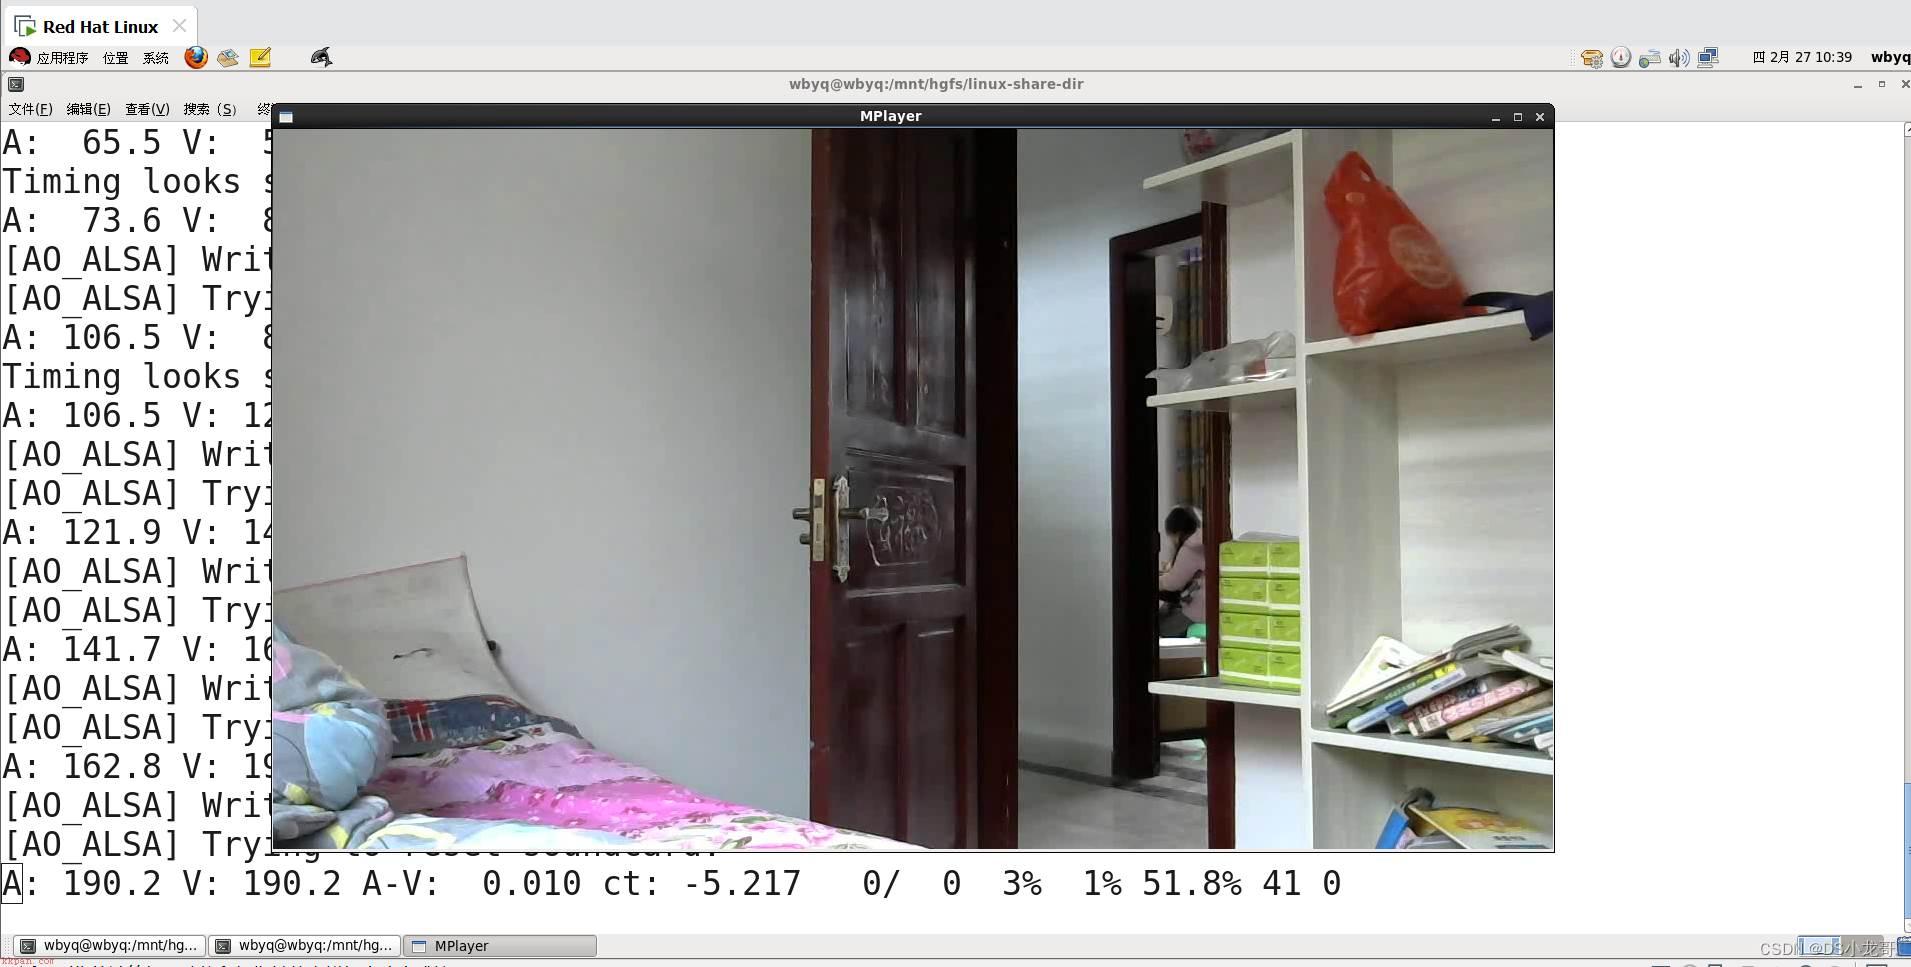
图3-7-2 linux下使用Mplayer拉流显示效果
服务器也可以直接采用B站的服务器,直接在B站注册账号,实名认证,开通直播功能,获取直播地址,然后直接推流即可,步骤可以参考3.2小节。
示例代码:
[wbyq@wbyq linux-share-dir]$ ffmpeg -thread_queue_size 128 -f video4linux2  -r 12 -s 1280x720 -i /dev/video0 -f alsa -i default -ar 44100 -ac 1 -f mp3 -qscale 5 -vcodec libx264 -acodec aac -f flv "rtmp://js.live-send.acg.tv/live-js/?streamname=live_68130189_71037877&key=b95d4cfda0c196518f104839fe5e7573"

参数解析:
vcodec libx264  指定视频编码为x264格式
-acodec aac     指定音频编码为aac
注意:推流到B站的实时视频,一定要指定视频编码为X264,音频为aac,否则推流过去可能会显示不出来。
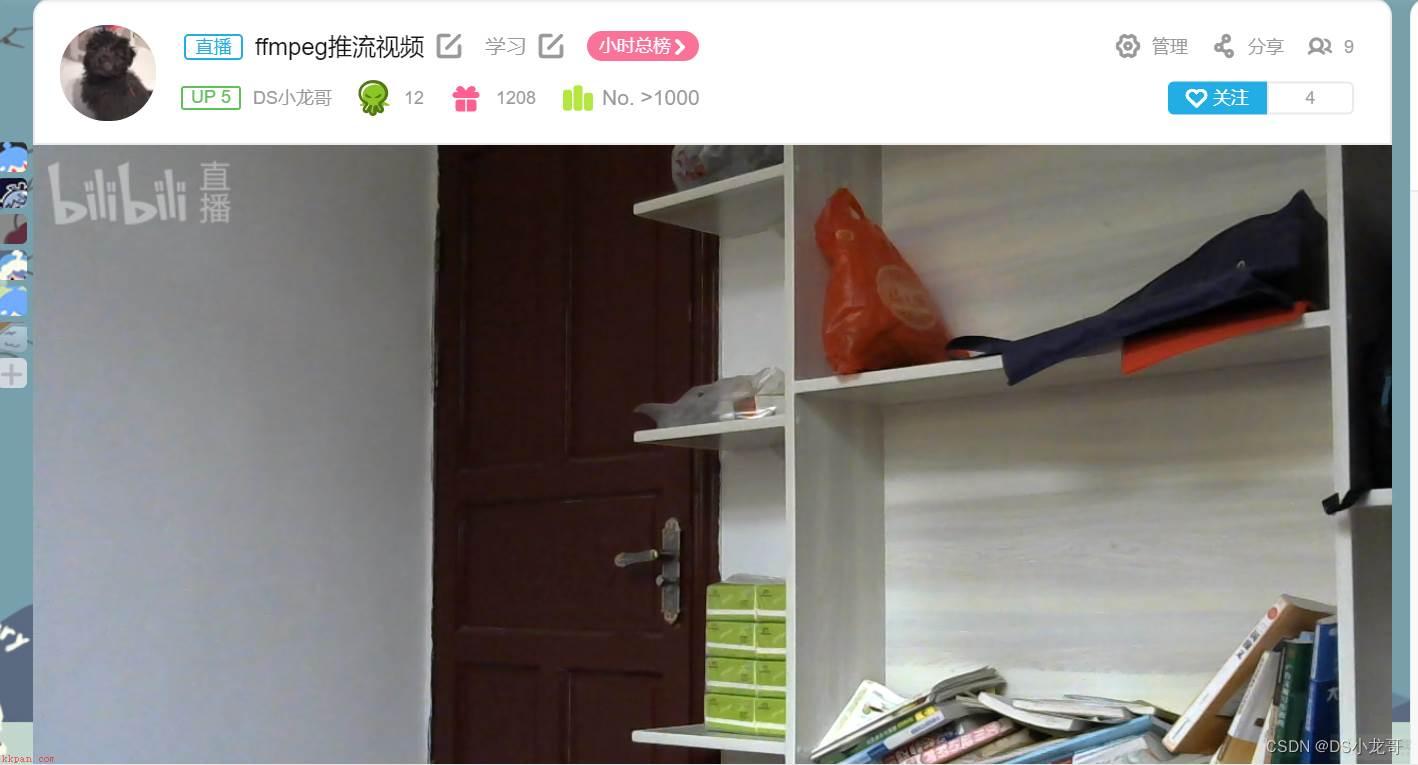
图3-7-2
(1). 添加静态水印
ffmpeg -re -i "/mnt/hgfs/linux-share-dir/Video_2020-01-18_1.wmv" -c copy -vcodec libx264 -acodec aac -vf drawtext="fontfile=arial.ttf:x=w-tw:fontcolor=red:fontsize=80:text='XiaoLong肖龙'" -f flv "rtmp://js.live-send.acg.tv/live-js/?streamname=live_68130189_71037877&key=b95d4cfda0c196518f104839fe5e7573"

参数介绍:
上面黄色底色部分代码是添加水印的代码。
fontcolor=red:设置颜色为红色
fontsize=80    设置字体大小为80
text='DS小龙哥' 设置显示的文本
(2). 添加动态时间水印
示例1: 在右上角添加时间水印
ffmpeg -re -i "/mnt/hgfs/linux-share-dir/Video_2020-01-18 1.wmv" -c copy -vcodec libx264 -acodec aac -vf drawtext="expansion=strftime:basetime=$(date +%s -d '2020-02-27 16:06:21'):fontfile=arial.ttf:x=w-tw:fontcolor=red:fontsize=30:text='%Y-%m-%d %H:%M: %S" -f flv "rtmp://js.live-send.acg.tv/live-js/?streamname=live_68130189_71037877&key=b95d4cfda0c196518f104839fe5e7573"
示例2:
ffmpeg -re -i "/mnt/hgfs/linux-share-dir/Video_2020-01-18_贪吃蛇游戏制作_1.wmv" -c copy -vcodec libx264 -acodec aac -vf drawtext="expansion=strftime:basetime=$(date +%s -d '2020-02-27 16:06:21'):fontfile=arial.ttf:x=w-tw:fontcolor=red:fontsize=80:text='XiaoLong肖龙 %Y-%m-%d %H:%M: %S" -f flv "rtmp://js.live-send.acg.tv/live-js/?streamname=live_68130189_71037877&key=b95d4cfda0c196518f104839fe5e7573"
FFmpeg中有一个和多媒体设备交互的类库:Libavdevice。
使用这个库可以读取电脑(或者其他设备上)的多媒体设备的数据或者输出数据到指定的多媒体设备上。
最简单的例子,调用Libavdevice库读取摄像头的一帧YUV数据,并保存成output.yuv文件。
Libavdevice支持以下设备作为输入端:
alsa
avfoundation
bktr
dshow
dv1394
fbdev
gdigrab
iec61883
jack
lavfi
libcdio
libdc1394
OpenAL
oss
pulse
qtkit
sndio
video4linux2, v4l2
vfwcap
x11grab
decklink
Libavdevice支持以下设备作为输出端:
alsa
caca
decklink
fbdev
opengl
oss
pulse
sdl
sndio
xv
示例代码: 采集一帧摄像头的数据,保存到本地
#include <stdio.h>
#include <stdlib.h>
#include "libavcodec/avcodec.h"
#include "libavformat/avformat.h"
#include "libswscale/swscale.h"
#include "libavdevice/avdevice.h"

int main(int argc, char* argv[])
{
    AVFormatContext *pFormatCtx;
    int             i, videoindex;
    AVCodecContext  *pCodecCtx;
    AVCodec         *pCodec;

    av_register_all();
    avformat_network_init();
    pFormatCtx=avformat_alloc_context();

    //注册设备
    avdevice_register_all();

    //Linux
    AVInputFormat *ifmt=av_find_input_format("video4linux2");
    if(avformat_open_input(&pFormatCtx,"/dev/video0",ifmt,NULL)!=0)
    {
        printf("无法打开输入流。/dev/video0
");
        return -1;
    }
    if(avformat_find_stream_info(pFormatCtx,NULL)<0)
    {
        printf("找不到流信息。
");
        return -1;
    }
    videoindex=-1;
    for(i=0;i<pFormatCtx->nb_streams;i++)
    if(pFormatCtx->streams[i]->codec->codec_type==AVMEDIA_TYPE_VIDEO)
    {
        videoindex=i;
        break;
    }
    if(videoindex==-1)
    {
        printf("找不到视频流.
");
        return -1;
    }
    pCodecCtx=pFormatCtx->streams[videoindex]->codec;
    pCodec=avcodec_find_decoder(pCodecCtx->codec_id);
    if(pCodec==NULL)
    {
        printf("找不到编解码器。
");
        return -1;
    }
    if(avcodec_open2(pCodecCtx, pCodec,NULL)<0)
    {
        printf("无法打开编解码器。
");
        return -1;
    }
    AVFrame *pFrame,*pFrameYUV;
    pFrame=av_frame_alloc();
    pFrameYUV=av_frame_alloc();
    unsigned char *out_buffer=(unsigned char *)av_malloc(av_image_get_buffer_size(AV_PIX_FMT_YUV420P, pCodecCtx->width, pCodecCtx->height,16));   // avpicture_get_size

    av_image_fill_arrays((AVPicture *)pFrameYUV->data,(AVPicture *)pFrameYUV->linesize,out_buffer, AV_PIX_FMT_YUV420P, pCodecCtx->width, pCodecCtx->height,16);

    //根据获取摄像头的宽高和指定的像素格式420,分配空间
    printf("摄像头尺寸:width=%d height=%d
",pCodecCtx->width, pCodecCtx->height);
    int screen_w=0,screen_h=0;
    int ret, got_picture;
    AVPacket *packet=(AVPacket *)av_malloc(sizeof(AVPacket));

    FILE *fp_yuv=fopen("output.yuv","wb+");

    struct SwsContext *img_convert_ctx;
    img_convert_ctx = sws_getContext(pCodecCtx->width, pCodecCtx->height, pCodecCtx->pix_fmt, pCodecCtx->width, pCodecCtx->height, AV_PIX_FMT_YUV420P, SWS_BICUBIC, NULL, NULL, NULL);
    //配置图像格式转换以及缩放参数
    if(av_read_frame(pFormatCtx, packet)>=0)
    {
        //输出图像的大小
        printf("数据大小=%d
",packet->size);
        //将数据写入文件
        if(packet->stream_index==videoindex)
        {
            ret = avcodec_decode_video2(pCodecCtx, pFrame, &got_picture, packet);  //解码从摄像头获取的数据,pframe结构
            if(ret < 0)
            {
                printf("解码Error.
");
                return -1;
            }
            if(got_picture)
            {
                sws_scale(img_convert_ctx,(const unsigned char* const*)pFrame->data, pFrame->linesize, 0, pCodecCtx->height, pFrameYUV->data, pFrameYUV->linesize);  //根据前面配置的缩放参数,进行图像格式转换以及缩放等操作
                int y_size=pCodecCtx->width*pCodecCtx->height;

                fwrite(pFrameYUV->data[0],1,y_size,fp_yuv);    //Y
                fwrite(pFrameYUV->data[1],1,y_size/4,fp_yuv);  //U
                fwrite(pFrameYUV->data[2],1,y_size/4,fp_yuv);  //V
            }
        }
        av_packet_unref(packet);
    }
    sws_freeContext(img_convert_ctx);
    fclose(fp_yuv);
    av_free(out_buffer);
    av_free(pFrameYUV);
    avcodec_close(pCodecCtx);
    avformat_close_input(&pFormatCtx);
    return 0;
}
Makefile文件代码:
app:
gcc ffmpeg_video.c -I /home/wbyq/pc_work/ffmpeg-3.0.2/_install/include -L /home/wbyq/pc_work/ffmpeg-3.0.2/_install/lib -lavcodec -lavfilter -lavutil -lswresample -lavdevice -lavformat -lpostproc -lswscale
编译运行代码示例:
[wbyq@wbyq ffmpeg_video]$ make
gcc -o app ffmpeg_video.c -I /home/wbyq/pc_work/ffmpeg-3.0.2/_install/include -L /home/wbyq/pc_work/ffmpeg-3.0.2/_install/lib -lavcodec -lavfilter -lavutil -lswresample -lavdevice -lavformat -lpostproc -lswscale -lm -L/home/wbyq/pc_work/x264-snapshot-20160527-2245/_install/lib -lx264
[wbyq@wbyq ffmpeg_video]$ ./app
摄像头尺寸:width=640 height=480
数据大小=614400
说明:
如果使用其他版本的FFMPEG编译本代码,出现如下警告:不建议使用‘xxxxxx’(声明于 xxxxx:xxx),
直接打开当前使用的FFMPEG源码,找到推荐的函数,替换旧函数即可
由于保存的图片是YUV格式,不能使用常规图片软件查看,windows下可以下载“7yuv”软件进行查看。
7yuv是一种方便的工具,用于编辑和可视化原始图形数据和二进制文件。它是辅助开发游戏,视频编解码器和常规图形编程的宝贵工具。 支持多种表面格式,包括RGB和YUV像素格式。 7yuv打开任何文件,无论类型或大小。数据以原始二进制格式处理,7yuv允许“位真编辑”。可以在图形,十六进制或文本模式下编辑数据。
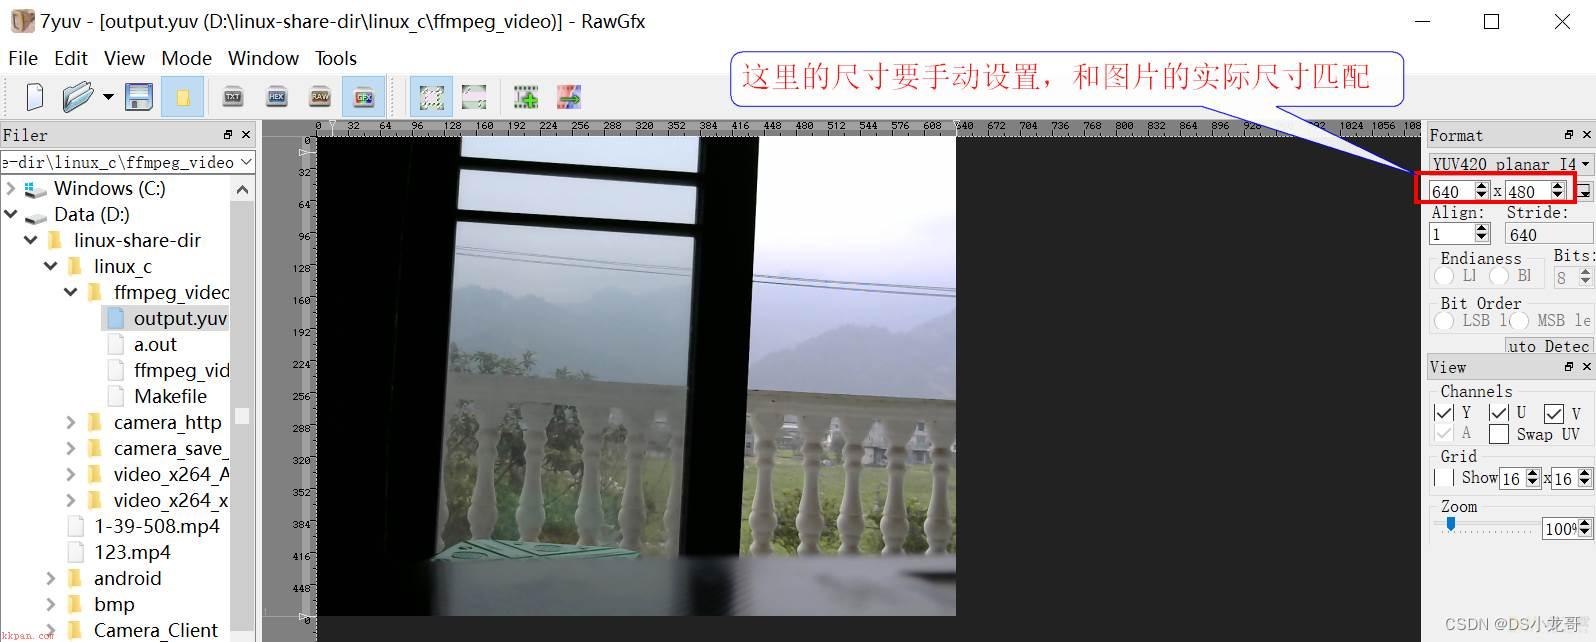
图4-1-1
常见的视频封装器与编码器的对应关系:
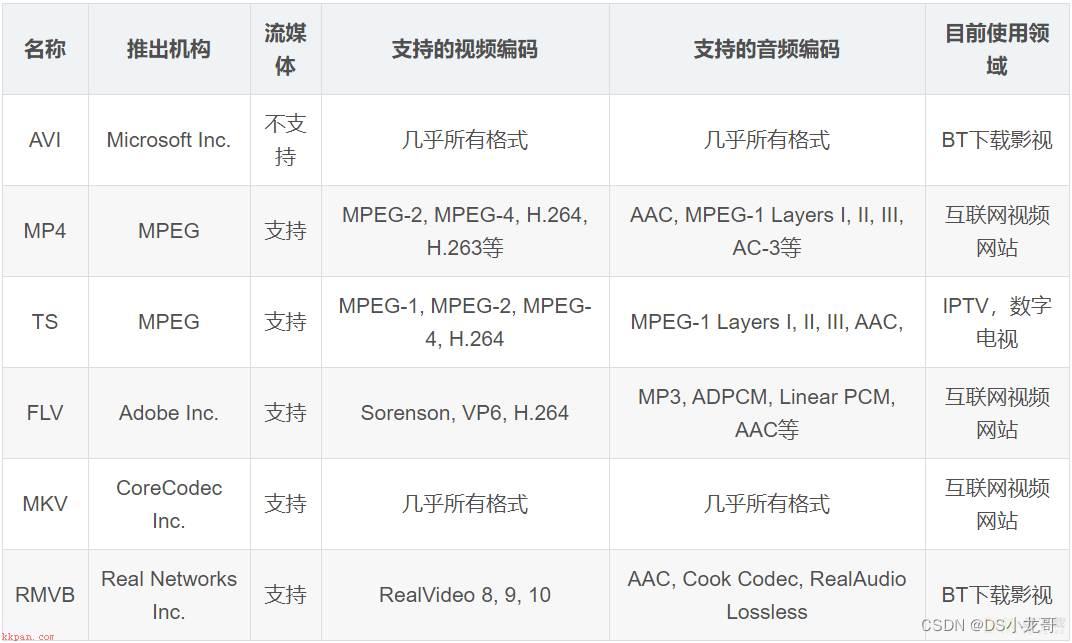
图4-2-1
使用FFMPEG命令捕获摄像头数据录制成视频:
[wbyq@wbyq ffmpeg_video]$ ffmpeg -f video4linux2 -s 1280x720 -i /dev/video0 -vcodec libx264 -f flv test.flv
参数解析:
-f <flv> 指定封装器名称。指定了封装器,不管文件后缀是什么,都会采用指定的封装器来封装文件。
-vcodec <libx264> 指定编码器
-i </dev/video0>  指定摄像头设备的节点
-f <video4linux2> 指定设备类型
-s <1280x720>     指定图像的尺寸
下面代码,参考源码/doc/example/muxing.c例子,采集摄像头一帧帧YUV数据,经过编码,封装成并保存成视频文件。
示例代码:
#include <stdlib.h>
#include <stdio.h>
#include <string.h>
#include <math.h>
#include <libavutil/avassert.h>
#include <libavutil/channel_layout.h>
#include <libavutil/opt.h>
#include <libavutil/mathematics.h>
#include <libavutil/timestamp.h>
#include <libavformat/avformat.h>
#include <libswscale/swscale.h>
#include <libswresample/swresample.h>

#define STREAM_DURATION   50.0 /*录制视频的持续时间  秒*/
#define STREAM_FRAME_RATE 5     /* images/s  这里可以根据摄像头的采集速度来设置帧率 */
#define STREAM_PIX_FMT    AV_PIX_FMT_YUV420P /* default pix_fmt */
#define SCALE_FLAGS SWS_BICUBIC

//存放视频的宽度和高度
int video_width;
int video_height;

// 单个输出AVStream的包装器
typedef struct OutputStream
{
    AVStream *st;
    AVCodecContext *enc;
    /*下一帧的点数*/
    int64_t next_pts;
    int samples_count;
    AVFrame *frame;
    AVFrame *tmp_frame;
    float t, tincr, tincr2;
    struct SwsContext *sws_ctx;
    struct SwrContext *swr_ctx;
}OutputStream;

typedef struct IntputDev
{
    AVCodecContext  *pCodecCtx;
    AVCodec         *pCodec;
    AVFormatContext *v_ifmtCtx;
    int  videoindex;
    struct SwsContext *img_convert_ctx;
    AVPacket *in_packet;
    AVFrame *pFrame,*pFrameYUV;
}IntputDev;

static void log_packet(const AVFormatContext *fmt_ctx, const AVPacket *pkt)
{
    AVRational *time_base = &fmt_ctx->streams[pkt->stream_index]->time_base;
    printf("pts:%s pts_time:%s dts:%s dts_time:%s duration:%s duration_time:%s stream_index:%d
",
           av_ts2str(pkt->pts), av_ts2timestr(pkt->pts, time_base),
           av_ts2str(pkt->dts), av_ts2timestr(pkt->dts, time_base),
           av_ts2str(pkt->duration), av_ts2timestr(pkt->duration, time_base),
           pkt->stream_index);
}

static int write_frame(AVFormatContext *fmt_ctx, const AVRational *time_base, AVStream *st, AVPacket *pkt)
{
    /* 将输出数据包时间戳值从编解码器重新调整为流时基 */
    av_packet_rescale_ts(pkt, *time_base, st->time_base);
    pkt->stream_index = st->index;

    /*将压缩的帧写入媒体文件。*/
    log_packet(fmt_ctx, pkt);
    return av_interleaved_write_frame(fmt_ctx, pkt);
}

/*添加输出流。 */
static void add_stream(OutputStream *ost, AVFormatContext *oc,AVCodec **codec,enum AVCodecID codec_id)
{
    AVCodecContext *c;
    int i;
    /* find the encoder */

    *codec = avcodec_find_encoder(codec_id);
    if (!(*codec))
    {
        fprintf(stderr, "Could not find encoder for '%s'
",
                avcodec_get_name(codec_id));
        exit(1);
    }
    ost->st = avformat_new_stream(oc, NULL);

    if (!ost->st) {
        fprintf(stderr, "Could not allocate stream
");
        exit(1);
    }
    ost->st->id = oc->nb_streams-1;
    c = avcodec_alloc_context3(*codec);
    if (!c) {
        fprintf(stderr, "Could not alloc an encoding context
");
        exit(1);
    }
    ost->enc = c;
    switch((*codec)->type)
    {
        case AVMEDIA_TYPE_AUDIO:
            c->sample_fmt  = (*codec)->sample_fmts ?
                (*codec)->sample_fmts[0] : AV_SAMPLE_FMT_FLTP;
            c->bit_rate    = 64000;
            c->sample_rate = 44100;
            if ((*codec)->supported_samplerates) {
                c->sample_rate = (*codec)->supported_samplerates[0];
                for (i = 0; (*codec)->supported_samplerates[i]; i++) {
                    if ((*codec)->supported_samplerates[i] == 44100)
                        c->sample_rate = 44100;
                }
            }
            c->channels        = av_get_channel_layout_nb_channels(c->channel_layout);
            c->channel_layout = AV_CH_LAYOUT_STEREO;
            if ((*codec)->channel_layouts) {
                c->channel_layout = (*codec)->channel_layouts[0];
                for (i = 0; (*codec)->channel_layouts[i]; i++) {
                    if ((*codec)->channel_layouts[i] == AV_CH_LAYOUT_STEREO)
                        c->channel_layout = AV_CH_LAYOUT_STEREO;
                }
            }
            c->channels        = av_get_channel_layout_nb_channels(c->channel_layout);
            ost->st->time_base = (AVRational){ 1, c->sample_rate };
            break;

        case AVMEDIA_TYPE_VIDEO:
            c->codec_id = codec_id;
            c->bit_rate = 2500000;  //平均比特率,例子代码默认值是400000
            /* 分辨率必须是2的倍数。*/
            c->width=video_width;
            c->height=video_height;
            /*时基:这是基本的时间单位(以秒为单位)
             *表示其中的帧时间戳。 对于固定fps内容,
             *时基应为1 /framerate,时间戳增量应为
             *等于1。*/
            ost->st->time_base = (AVRational){1,STREAM_FRAME_RATE};  //帧率设置
            c->time_base       = ost->st->time_base;
            c->gop_size      = 12; /* 最多每十二帧发射一帧内帧 */
            c->pix_fmt       = STREAM_PIX_FMT;
            if(c->codec_id == AV_CODEC_ID_MPEG2VIDEO)
            {
                /* 只是为了测试,我们还添加了B帧 */
                c->max_b_frames = 2;
            }
            if(c->codec_id == AV_CODEC_ID_MPEG1VIDEO)
            {
                /*需要避免使用其中一些系数溢出的宏块。
                 *普通视频不会发生这种情况,因为
                 *色度平面的运动与亮度平面不匹配。 */
                c->mb_decision = 2;
            }
        break;

        default:
            break;
    }

    /* 某些格式希望流头分开。 */
    if (oc->oformat->flags & AVFMT_GLOBALHEADER)
        c->flags |= AV_CODEC_FLAG_GLOBAL_HEADER;
}

static AVFrame *alloc_picture(enum AVPixelFormat pix_fmt, int width, int height)
{
    AVFrame *picture;
    int ret;
    picture = av_frame_alloc();
    if (!picture)
        return NULL;
    picture->format = pix_fmt;
    picture->width  = width;
    picture->height = height;

    /* 为帧数据分配缓冲区 */
    ret = av_frame_get_buffer(picture, 32);
    if(ret<0)
    {
        fprintf(stderr, "Could not allocate frame data.
");
        exit(1);
    }
    return picture;
}

static void open_video(AVFormatContext *oc, AVCodec *codec, OutputStream *ost, AVDictionary *opt_arg)
{
    int ret;
    AVCodecContext *c = ost->enc;
    AVDictionary *opt = NULL;

    av_dict_copy(&opt, opt_arg, 0);

    /* open the codec */
    ret = avcodec_open2(c, codec, &opt);
    av_dict_free(&opt);
    if (ret < 0)
    {
        fprintf(stderr, "Could not open video codec: %s
", av_err2str(ret));
        exit(1);
    }

    /* 分配并初始化可重用框架 */
    ost->frame = alloc_picture(c->pix_fmt, c->width, c->height);
    if (!ost->frame)
    {
        fprintf(stderr, "Could not allocate video frame
");
        exit(1);
    }
    printf("ost->frame alloc success fmt=%d w=%d h=%d
",c->pix_fmt,c->width, c->height);


    /*如果输出格式不是YUV420P,则为临时YUV420P
    *也需要图片。 然后将其转换为所需的
    *输出格式。 */
    ost->tmp_frame = NULL;
    if(c->pix_fmt != AV_PIX_FMT_YUV420P)
    {
        ost->tmp_frame = alloc_picture(AV_PIX_FMT_YUV420P, c->width, c->height);
        if (!ost->tmp_frame)
        {
            fprintf(stderr, "Could not allocate temporary picture
");
            exit(1);
        }
    }

    /* 将流参数复制到多路复用器*/
    ret=avcodec_parameters_from_context(ost->st->codecpar, c);
    if(ret<0)
    {
        fprintf(stderr, "Could not copy the stream parameters
");
        exit(1);
    }
}

/*
  *编码一个视频帧
  *编码完成后返回1,否则返回0
  */
static int write_video_frame(AVFormatContext *oc, OutputStream *ost,AVFrame *frame)
{
    int ret;
    AVCodecContext *c;
    int got_packet=0;
    AVPacket pkt={0};
    if(frame==NULL)
        return 1;
    c = ost->enc;
    av_init_packet(&pkt);
    /* 编码图像*/
    ret = avcodec_encode_video2(c, &pkt, frame, &got_packet);
    if(ret<0)
    {
        fprintf(stderr, "Error encoding video frame: %s
", av_err2str(ret));
        exit(1);
    }
    printf("--------------video- pkt.pts=%s
",av_ts2str(pkt.pts));
    printf("----st.num=%d st.den=%d codec.num=%d codec.den=%d---------
",ost->st->time_base.num,ost->st->time_base.den,
            c->time_base.num,c->time_base.den);
    if(got_packet)
    {
        ret = write_frame(oc, &c->time_base, ost->st, &pkt);
    }else
    {
        ret = 0;
    }
    if(ret<0)
    {
        fprintf(stderr, "Error while writing video frame: %s
", av_err2str(ret));
        exit(1);
    }
    return (frame || got_packet) ? 0 : 1;
}


static AVFrame *get_video_frame(OutputStream *ost,IntputDev* input,int *got_pic)
{
    int ret, got_picture;
    AVCodecContext *c = ost->enc;
    AVFrame * ret_frame=NULL;
    if(av_compare_ts(ost->next_pts, c->time_base,STREAM_DURATION, (AVRational){1,1})>=0)
        return NULL;

    /*当我们将帧传递给编码器时,它可能会保留对它的引用
    *内部,确保我们在这里不覆盖它*/
    if (av_frame_make_writable(ost->frame)<0)
        exit(1);
    if(av_read_frame(input->v_ifmtCtx, input->in_packet)>=0)
    {
        if(input->in_packet->stream_index==input->videoindex)
        {
            ret = avcodec_decode_video2(input->pCodecCtx, input->pFrame, &got_picture, input->in_packet);
            *got_pic=got_picture;
            if(ret<0)
            {
                printf("Decode Error.
");
                av_packet_unref(input->in_packet);
                return NULL;
            }
            if(got_picture)
            {
                sws_scale(input->img_convert_ctx, (const unsigned char* const*)input->pFrame->data, input->pFrame->linesize, 0, input->pCodecCtx->height, ost->frame->data,  ost->frame->linesize);
                ost->frame->pts =ost->next_pts++;
                ret_frame= ost->frame;
            }
        }
        av_packet_unref(input->in_packet);
    }
    return ret_frame;
}
static void close_stream(AVFormatContext *oc, OutputStream *ost)
{
    avcodec_free_context(&ost->enc);
    av_frame_free(&ost->frame);
    av_frame_free(&ost->tmp_frame);
    sws_freeContext(ost->sws_ctx);
    swr_free(&ost->swr_ctx);
}

/*
采集摄像头数据编码成MP4视频
*/
int main(int argc, char **argv)
{
    OutputStream video_st = { 0 }, audio_st = { 0 };
    const char *filename;
    AVOutputFormat *fmt;
    AVFormatContext *oc;
    AVCodec *audio_codec, *video_codec;
    int ret;
    int have_video = 0, have_audio = 0;
    int encode_video = 0, encode_audio = 0;
    AVDictionary *opt = NULL;
    int i;

    if(argc<3)
    {
        //./app /dev/video0 123.mp4
        printf("用法: %s <摄像头设备节点> <文件名称>
", argv[0]);
        return 1;
    }

    filename = argv[2];
    printf("当前存储的视频文件名称:%s
",filename);
    /*分配输出媒体环境*/
    avformat_alloc_output_context2(&oc, NULL, NULL, filename);
    if(!oc)
    {
        printf("无法从文件扩展名推断出输出格式:使用MPEG。
");
        avformat_alloc_output_context2(&oc, NULL, "mpeg", filename);
    }
    if(!oc)return 1;
    //添加摄像头----------------------------------
    IntputDev video_input={0};
    AVCodecContext  *pCodecCtx;
    AVCodec         *pCodec;
    AVFormatContext *v_ifmtCtx;
    avdevice_register_all();
    v_ifmtCtx = avformat_alloc_context();
    //Linux下指定摄像头信息
    AVInputFormat *ifmt=av_find_input_format("video4linux2");
    if(avformat_open_input(&v_ifmtCtx,argv[1],ifmt,NULL)!=0)
    {
        printf("无法打开输入流.%s
",argv[1]);
        return -1;
    }
    if(avformat_find_stream_info(v_ifmtCtx,NULL)<0)
    {
        printf("找不到流信息.
");
        return -1;
    }
    int videoindex=-1;
    for(i=0; i<v_ifmtCtx->nb_streams; i++)
    if(v_ifmtCtx->streams[i]->codec->codec_type==AVMEDIA_TYPE_VIDEO)
    {
        videoindex=i;
        printf("videoindex=%d
",videoindex);
        break;
    }
    if(videoindex==-1)
    {
        printf("找不到视频流。
");
        return -1;
    }
    pCodecCtx=v_ifmtCtx->streams[videoindex]->codec;
    pCodec=avcodec_find_decoder(pCodecCtx->codec_id);
    if(pCodec==NULL)
    {
        printf("找不到编解码器。
");
        return -1;
    }
    if(avcodec_open2(pCodecCtx, pCodec,NULL)<0)
    {
        printf("无法打开编解码器。
");
        return -1;
    }

    AVFrame *pFrame,*pFrameYUV;
    pFrame=av_frame_alloc();
    pFrameYUV=av_frame_alloc();

    unsigned char *out_buffer=(unsigned char *)av_malloc(av_image_get_buffer_size(AV_PIX_FMT_YUV420P, pCodecCtx->width, pCodecCtx->height,16));
    av_image_fill_arrays((AVPicture *)pFrameYUV->data,(AVPicture *)pFrameYUV->linesize, out_buffer, AV_PIX_FMT_YUV420P, pCodecCtx->width, pCodecCtx->height,16);
    printf("摄像头尺寸(WxH): %d x %d
",pCodecCtx->width, pCodecCtx->height);
    video_width=pCodecCtx->width;
    video_height=pCodecCtx->height;
    struct SwsContext *img_convert_ctx;
    img_convert_ctx = sws_getContext(pCodecCtx->width, pCodecCtx->height, pCodecCtx->pix_fmt, pCodecCtx->width, pCodecCtx->height, AV_PIX_FMT_YUV420P, SWS_BICUBIC, NULL, NULL, NULL);
    AVPacket *in_packet=(AVPacket *)av_malloc(sizeof(AVPacket));
    video_input.img_convert_ctx=img_convert_ctx;
    video_input.in_packet=in_packet;
    video_input.pCodecCtx=pCodecCtx;
    video_input.pCodec=pCodec;
    video_input.v_ifmtCtx=v_ifmtCtx;
    video_input.videoindex=videoindex;
    video_input.pFrame=pFrame;
    video_input.pFrameYUV=pFrameYUV;
    //-----------------------------添加摄像头结束
    fmt=oc->oformat;
    /*使用默认格式的编解码器添加音频和视频流并初始化编解码器。*/
    printf("fmt->video_codec = %d
", fmt->video_codec);
    if(fmt->video_codec != AV_CODEC_ID_NONE)
    {
        add_stream(&video_st,oc,&video_codec,fmt->video_codec);
        have_video=1;
        encode_video=1;
    }
    /*现在已经设置了所有参数,可以打开音频并视频编解码器,并分配必要的编码缓冲区。*/
    if(have_video)open_video(oc, video_codec, &video_st, opt);
    av_dump_format(oc,0,filename,1);
    /* 打开输出文件(如果需要) */
    if(!(fmt->flags & AVFMT_NOFILE))
    {
        ret=avio_open(&oc->pb,filename,AVIO_FLAG_WRITE);
        if(ret<0)
        {
            fprintf(stderr, "打不开'%s': %s
", filename,av_err2str(ret));
            return 1;
        }
    }
    /* 编写流头(如果有)*/
    ret=avformat_write_header(oc, &opt);
    if(ret<0)
    {
        fprintf(stderr, "打开输出文件时发生错误: %s
",av_err2str(ret));
        return 1;
    }
    int got_pic;
    while(encode_video)
    {
        /*选择要编码的流*/
        AVFrame *frame=get_video_frame(&video_st,&video_input,&got_pic);
        if(!got_pic)
        {
            usleep(10000);
            continue;
        }
        encode_video=!write_video_frame(oc,&video_st,frame);
    }
    av_write_trailer(oc);
    sws_freeContext(video_input.img_convert_ctx);
    avcodec_close(video_input.pCodecCtx);
    av_free(video_input.pFrameYUV);
    av_free(video_input.pFrame);
    avformat_close_input(&video_input.v_ifmtCtx);
    /*关闭每个编解码器*/
    if (have_video)close_stream(oc, &video_st);
    /*关闭输出文件*/
    if (!(fmt->flags & AVFMT_NOFILE))avio_closep(&oc->pb);
    /*释放流*/
    avformat_free_context(oc);
    return 0;
}
Makefile文件代码:
app:
    gcc ffmpeg_video.c -I /home/wbyq/pc_work/ffmpeg-4.2.2/_install/include -L /home/wbyq/pc_work/ffmpeg-4.2.2/_install/lib -lavcodec -lavfilter -lavutil -lswresample -lavdevice -lavformat -lpostproc -lswscale
运行示例:
[root@wbyq ffmpeg_video]# make
gcc ffmpeg_video.c -I /home/wbyq/pc_work/ffmpeg-4.2.2/_install/include -L /home/wbyq/pc_work/ffmpeg-4.2.2/_install/lib -lavcodec -lavfilter -lavutil -lswresample -lavdevice -lavformat -lpostproc -lswscale
ffmpeg_video.c: 在函数‘write_video_frame’中:
ffmpeg_video.c:248: 警告:不建议使用‘avcodec_encode_video2’(声明于 /home/wbyq/pc_work/ffmpeg-4.2.2/_install/include/libavcodec/avcodec.h:5462)
ffmpeg_video.c: 在函数‘get_video_frame’中:
ffmpeg_video.c:289: 警告:不建议使用‘avcodec_decode_video2’(声明于 /home/wbyq/pc_work/ffmpeg-4.2.2/_install/include/libavcodec/avcodec.h:4828)
ffmpeg_video.c: 在函数‘main’中:
ffmpeg_video.c:371: 警告:不建议使用‘codec’(声明于 /home/wbyq/pc_work/ffmpeg-4.2.2/_install/include/libavformat/avformat.h:885)
ffmpeg_video.c:382: 警告:不建议使用‘codec’(声明于 /home/wbyq/pc_work/ffmpeg-4.2.2/_install/include/libavformat/avformat.h:885)

[root@wbyq ffmpeg_video]# ./a.out /dev/video1 1.mp4
当前存储的视频文件名称:1.mp4
videoindex=0
摄像头尺寸(WxH): 1280 x 720
fmt->video_codec = 27
[libx264 @ 0x8795a80] using cpu capabilities: MMX2 SSE2Fast SSSE3 SSE4.2 AVX FMA3
[libx264 @ 0x8795a80] profile High, level 3.1
[libx264 @ 0x8795a80] 264 - core 148 - H.264/MPEG-4 AVC codec - Copyleft 2003-2016 - http://www.videolan.org/x264.html - options: cabac=1 ref=3 deblock=1:0:0 analyse=0x3:0x113 me=hex subme=7 psy=1 psy_rd=1.00:0.00 mixed_ref=1 me_range=16 chroma_me=1 trellis=1 8x8dct=1 cqm=0 deadzone=21,11 fast_pskip=1 chroma_qp_offset=-2 threads=3 lookahead_threads=1 sliced_threads=0 nr=0 decimate=1 interlaced=0 bluray_compat=0 constrained_intra=0 bframes=3 b_pyramid=2 b_adapt=1 b_bias=0 direct=1 weightb=1 open_gop=0 weightp=2 keyint=12 keyint_min=1 scenecut=40 intra_refresh=0 rc_lookahead=12 rc=abr mbtree=1 bitrate=2500 ratetol=1.0 qcomp=0.60 qpmin=0 qpmax=69 qpstep=4 ip_ratio=1.40 aq=1:1.00
ost->frame alloc success fmt=0 w=1280 h=720
Output #0, mp4, to '1.mp4':
Stream #0:0: Video: h264, yuv420p, 1280x720, q=2-31, 2500 kb/s, 5 tbn
………………省略………….. 推流本地视频文件到流媒体服务器,与3.2章节的命令效果是一样的。
示例代码:
#include <stdlib.h>
#include <stdio.h>
#include <string.h>
#include <math.h>
#include <libavutil/avassert.h>
#include <libavutil/channel_layout.h>
#include <libavutil/opt.h>
#include <libavutil/mathematics.h>
#include <libavutil/timestamp.h>
#include <libavformat/avformat.h>
#include <libswscale/swscale.h>
#include <libswresample/swresample.h>
#include <signal.h>

int main(int argc, char * argv[])
{
    AVFormatContext *pInFmtContext = NULL;
    AVStream *in_stream;
    AVCodecContext *pInCodecCtx;
    AVCodec *pInCodec;
    AVPacket *in_packet;
    AVFormatContext * pOutFmtContext;
    AVOutputFormat *outputFmt;
    AVStream * out_stream;
    AVRational frame_rate;
    double duration;
    int ret;
    char in_file[128] = {0};
    char out_file[256] = {0};
    int videoindex = -1;
    int audioindex = -1;
    int video_frame_count = 0;
    int audio_frame_count = 0;
    int video_frame_size = 0;
    int audio_frame_size = 0;
    int i;
    int got_picture;
    if(argc < 2)
    {
        printf("Usage: a.out <in_filename> <url>
");
        return -1;
    }
    memcpy(in_file, argv[1], strlen(argv[1]));
    memcpy(out_file, argv[2], strlen(argv[2]));
    if(avformat_open_input ( &pInFmtContext, in_file, NULL, NULL) < 0)
    {
        printf("avformat_open_input failed
");
        return -1;
    }

    //查询输入流中的所有流信息
    if(avformat_find_stream_info(pInFmtContext, NULL) < 0)
    {
        printf("avformat_find_stream_info failed
");
        return -1;
    }
    //print
    av_dump_format(pInFmtContext, 0, in_file, 0);
    ret = avformat_alloc_output_context2(&pOutFmtContext, NULL, "flv", out_file);
    if(ret < 0)
    {
        printf("avformat_alloc_output_context2 failed
");
        return -1;
    }
    for(i=0; i < pInFmtContext->nb_streams; i++)
    {
        in_stream = pInFmtContext->streams[i];
        if( in_stream->codecpar->codec_type == AVMEDIA_TYPE_AUDIO)
        {
            audioindex = i;
        }
        if( in_stream->codecpar->codec_type == AVMEDIA_TYPE_VIDEO)
        {
            videoindex = i;
            frame_rate = av_guess_frame_rate(pInFmtContext, in_stream, NULL);
            printf("video: frame_rate:%d/%d
", frame_rate.num, frame_rate.den);
            printf("video: frame_rate:%d/%d
", frame_rate.den, frame_rate.num);
            duration = av_q2d((AVRational){frame_rate.den, frame_rate.num});
        }

        pInCodec = avcodec_find_decoder(in_stream->codecpar->codec_id);
        printf("%x, %d
", pInCodec, in_stream->codecpar->codec_id);
        out_stream = avformat_new_stream(pOutFmtContext,  pInCodec);//in_stream->codec->codec);
        if( out_stream == NULL)
        {
            printf("avformat_new_stream failed:%d
",i);
        }

        ret = avcodec_parameters_copy(out_stream->codecpar, in_stream->codecpar);
        if( ret < 0)
        {
            printf("avcodec_parameters_copy failed:%d
", i);
        }
        out_stream->codecpar->codec_tag = 0;
        if(pOutFmtContext->oformat->flags & AVFMT_GLOBALHEADER)
        {//AVFMT_GLOBALHEADER代表封装格式包含“全局头”(即整个文件的文件头),大部分封装格式是这样的。一些封装格式没有“全局头”,比如MPEG2TS
            out_stream->codec->flags |= AV_CODEC_FLAG_GLOBAL_HEADER;
        }
    }
    av_dump_format(pOutFmtContext,0,out_file,1);
    ret=avio_open(&pOutFmtContext->pb, out_file, AVIO_FLAG_WRITE);
    if(ret<0)
    {
        printf("avio_open failed:%d
", ret);
        return -1;
    }
    int64_t start_time = av_gettime();
    ret = avformat_write_header(pOutFmtContext, NULL);
    in_packet = av_packet_alloc();
    while(1)
    {
        ret=av_read_frame(pInFmtContext, in_packet);
        if(ret<0)
        {
            printf("read frame end
");
            break;
        }
        in_stream = pInFmtContext->streams[in_packet->stream_index];
        if(in_packet->stream_index == videoindex)
        {
            video_frame_size += in_packet->size;
            printf("recv %5d video frame %5d-%5d
", ++video_frame_count, in_packet->size, video_frame_size);
        }

        if(in_packet->stream_index == audioindex)
        {
            audio_frame_size += in_packet->size;
            printf("recv %5d audio frame %5d-%5d
", ++audio_frame_count, in_packet->size, audio_frame_size);
        }

        int codec_type = in_stream->codecpar->codec_type;
        if(codec_type == AVMEDIA_TYPE_VIDEO)
        {
            //根据pts时间与系统时间的关系来计算延时时间,该方案更优
            AVRational  dst_time_base = {1, AV_TIME_BASE};
            int64_t pts_time=av_rescale_q(in_packet->pts,in_stream->time_base, dst_time_base);
            int64_t now_time=av_gettime() - start_time;
            if(pts_time > now_time)
            av_usleep(pts_time - now_time);
        }
        out_stream = pOutFmtContext->streams[in_packet->stream_index];
        av_packet_rescale_ts(in_packet,in_stream->time_base, out_stream->time_base);
        in_packet->pos = -1;
        ret = av_interleaved_write_frame(pOutFmtContext, in_packet);
        if(ret<0)
        {
            printf("av_interleaved_write_frame failed
");
            break;
        }
        av_packet_unref(in_packet);
    }
    av_write_trailer(pOutFmtContext);
    av_packet_free(&in_packet);
    avformat_close_input(&pInFmtContext);
    avio_close( pOutFmtContext->pb);
    avformat_free_context(pOutFmtContext);
    return 0;
}
Makefile文件代码:
app:
    gcc ffmpeg_video.c -I /home/wbyq/pc_work/ffmpeg-4.2.2/_install/include -L /home/wbyq/pc_work/ffmpeg-4.2.2/_install/lib -lavcodec -lavfilter -lavutil -lswresample -lavdevice -lavformat -lpostproc -lswscale
编译运行示例:
[root@wbyq ffmpeg_video]# ./a.out /mnt/hgfs/linux-share-dir/1-39-508.mp4 rtmp://js.live-send.acg.tv/live-js/?streamname=live_68130189_71037877&key=b95d4cfda0c196518f104839fe5e7573
第一步: 在QT的工程文件(xxx.pro)里添加FFMPEG和X264的头文件、库文件路径(MiGW编译器)
#指定库的路径
unix:LIBS += -L/home/wbyq/work_pc/ffmpeg-4.2.2/_install/lib -lavcodec
unix:LIBS += -L/home/wbyq/work_pc/ffmpeg-4.2.2/_install/lib -lavfilter
unix:LIBS += -L/home/wbyq/work_pc/ffmpeg-4.2.2/_install/lib -lavutil
unix:LIBS += -L/home/wbyq/work_pc/ffmpeg-4.2.2/_install/lib -lavdevice
unix:LIBS += -L/home/wbyq/work_pc/ffmpeg-4.2.2/_install/lib -lavformat
unix:LIBS += -L/home/wbyq/work_pc/ffmpeg-4.2.2/_install/lib -lpostproc
unix:LIBS += -L/home/wbyq/work_pc/ffmpeg-4.2.2/_install/lib -lswscale
unix:LIBS += -L/home/wbyq/work_pc/ffmpeg-4.2.2/_install/lib -lswresample
unix:LIBS += -L/home/wbyq/work_pc/x264-snapshot-20181217-2245/_install/lib -lx264

#制定头文件的路径
INCLUDEPATH+=/home/wbyq/work_pc/ffmpeg-4.2.2/_install/include
INCLUDEPATH+=/home/wbyq/work_pc/x264-snapshot-20181217-2245/_install/include
如果在C++代码里穿插C语言代码可以在头文件里指定使用C语言方式调用即可。(MiGW编译器)
#指定库的路径
unix:LIBS += -L$$PWD/ffmpeg_x264_lib/lib -lavcodec
unix:LIBS += -L$$PWD/ffmpeg_x264_lib/lib -lavfilter
unix:LIBS += -L$$PWD/ffmpeg_x264_lib/lib -lavutil
unix:LIBS += -L$$PWD/ffmpeg_x264_lib/lib -lavdevice
unix:LIBS += -L$$PWD/ffmpeg_x264_lib/lib -lavformat
unix:LIBS += -L$$PWD/ffmpeg_x264_lib/lib -lpostproc
unix:LIBS += -L$$PWD/ffmpeg_x264_lib/lib -lswscale
unix:LIBS += -L$$PWD/ffmpeg_x264_lib/lib -lswresample
unix:LIBS += -L$$PWD/ffmpeg_x264_lib/lib -lx264

#制定头文件的路径
INCLUDEPATH+=$$PWD/ffmpeg_x264_lib/include
再加路径的时候的可以使用$$PWD获取当前路径,方便填路径:
extern "C"
{
    #include "ffmpeg_get_image.h"
}
如果是MSVC编译器,可以使用#pragma comment(lib,...)这种方式导入lib。
直接在cpp代码里编写代码,加入库:
#pragma comment(lib,"libavcodec.a")
#pragma comment(lib,"libavfilter.a")
#pragma comment(lib,"libavutil.a")
#pragma comment(lib,"libswresample.a")
#pragma comment(lib,"libx264.a")
#pragma comment(lib,"libavdevice.a")
#pragma comment(lib,"libavformat.a")
#pragma comment(lib,"libavdevice.a")
#pragma comment(lib,"libpostproc.a")
#pragma comment(lib,"libswscale.a")